Creating percentage-based margin with Auto Layout in iOS / Swift
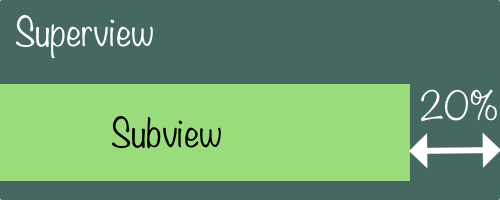
This a library for creating percentage-based margins between views and their superviews in iOS. It allows, for example, to create an Auto Layout constraint for the trailing margin of 20% between the view and its superview. Because the margin is percentage-based its absolute size will adapt automatically when the superview size changes.
Setup
There are three ways you can add PercentageMargin to your project.
Add source (iOS 7+)
Simply add PercentageMargin.swift file into your Xcode project.
Setup with Carthage (iOS 8+)
Add github "exchangegroup/PercentageMargin" ~> 1.0 to your Cartfile and run carthage update.
Setup with CocoaPods (iOS 8+)
If you are using CocoaPods add this text to your Podfile and run pod install.
use_frameworks!
pod 'PercentageMargin', '~> 1.0'
Usage
Add import PercentageMargin to your source code if you used Carthage or CocoaPods setup methods.
-
Create a constraint between your view and its superview in the storyboard.
-
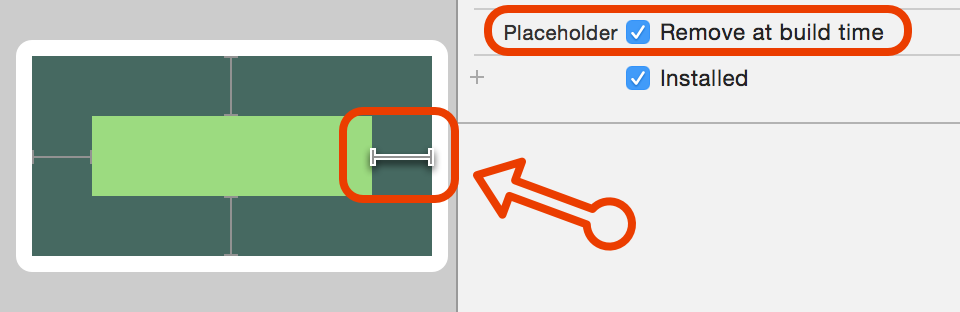
Check "remove at build time" option for the constraint in the attributes inspector. A percentage-based constraint will be created form the code instead.
-
Create outlets for both your subview and its superview in the view controller.
-
Finally, create the percentage-based constraint between the view or its superview. It can be done in viewDidLoad method. In this example, we create a trailing constraint for 20% margin of the superview width.
override func viewDidLoad() {
  super.viewDidLoad()

  let constraint = PercentageMargin.createTrailingConstraint(subview, superview: superview, marginPercentage: 20)
  NSLayoutConstraint.activateConstraints([constraint])
}
Creating top, bottom, leading and trailing constraints
// Create top constraint for 20% margin
let constraintTop = PercentageMargin.createTopConstraint(subview, superview: superview, marginPercentage: 20)
NSLayoutConstraint.activateConstraints([constraintTop])

// Create bottom constraint for 20% margin
let constraintBottom = PercentageMargin.createBottomConstraint(subview, superview: superview, marginPercentage: 20)
NSLayoutConstraint.activateConstraints([constraintBottom])

// Create leading constraint for 20% margin
let constraintLeading = PercentageMargin.createLeadingConstraint(subview, superview: superview, marginPercentage: 20)
NSLayoutConstraint.activateConstraints([constraintLeading])

// Create trailing constraint for 20% margin
let constraintTrailing = PercentageMargin.createTrailingConstraint(subview, superview: superview, marginPercentage: 20)
NSLayoutConstraint.activateConstraints([constraintTrailing])
Shortcut functions for creating many constrains
// Create top and bottom constraints for 20% margin
let constraintVertical = PercentageMargin.createVerticalConstraints(subview, superview: superview, marginPercentage: 20)
NSLayoutConstraint.activateConstraints(constraintVertical)

// Create leading and trailing constraints for 20% margin
let constraintHorizontal = PercentageMargin.createHorizontalConstraints(subview, superview: superview, marginPercentage: 20)
NSLayoutConstraint.activateConstraints(constraintHorizontal)

// Create constraints for 20% margins on all four sides of the subview
let constraint4Sides = PercentageMargin.createConstraintsOnFourSides(subview, superview: superview, marginPercentage: 20)
NSLayoutConstraint.activateConstraints(constraint4Sides)
How it works
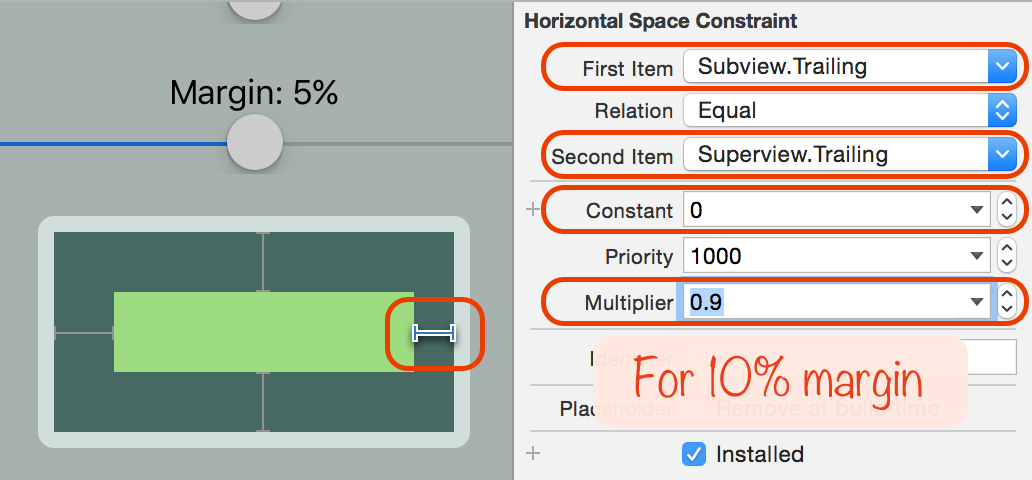
For those who are curious this is how the library works under the hood. Percentage-based constraints can be easily created in the storyboard. For example, suppose we want to create a 10% trailing margin constraint. This is how it is done:
- Create a trailing constraint between your view and its superview.
- Make sure the first constraint item is the subview and the second item is the superview. This can be done by clicking on the first item drop down and selecting Reverse First and Second Item.
- Change the constant value of the constraint to zero in the attributes inspector.
- Change the multiplier value to 0.9.
Creating the leading margin can be done in a similar way but there are some nuances.
- You will start by creating a leading constraint.
- Next, change the second item from the superview leading to trailing.
- Change the constant value to zero and the multiplier value to 0.1.
You can use the same technique to create top and bottom margins with constraints. Remember to keep superview in the second item and set it to 'bottom'.
Handling right-to-left language layouts
Unfortunately, the method described above for creating leading and trailing constraints in the storyboard does not work for right-to-left languages. You can test it by running the app in the simulator with the language set to Right to left pseudolanguage in option section of the scheme settings.
Right-to-left language layout require different constraint setup. In this case both the multiplier and the second constraint item need to be reversed relative to the normal layout. For example, the trailing margin will have multiplier of 0.1 and the second item needs to be 'leading' for the trailing constraint. This library handles the right-to-left language layout automatically.
Demo app
The project includes a demo iOS apps.
License
PercentageMargin is released under the MIT License.
