Count Von Count

Count-von-Count is an open source project that was developed at FTBpro for a gamification project and it turned into something that can count any kind of action. It is based on Nginx and Redis, and leverages them to create a live, scalable and easy to use counting solution for a wide range of scenarios.
Table of Contents
- What It's All About
- General Overview
- Getting Started - Counting, It's easy as 1,2,3
- Counting Configuration
- Counting Options
- Simple Count
- Multiple Objects of The Same Type
- Multiple Objects of Different Type
- Object With Multiple Ids
- Dynamic Count - Parameter as Counter Name
- Counting Several Actions
- Ordered Sets (Leaderboard) - Save The Counters Data in Order
- Advanced: Custom Functions - Writing Your Own Logic
- Variable Count - Not Just Increase by 1
- Expire - Setting TTL on Redis Data
- Request Metadata Parameters Plugins
- Counting Options
- Retrieving Data
- Advanced
What It's All About
Count-von-Count can help you whenever you need to store counters data. Its advantage is that it can process thousands of requests per second and update the numbers in real-time, no caching/background processes needed.
Here is a short video about this project
With Count-von-Count you can:
- Count number of visitors on a site/page.
- Track number of clicks hourly/daily/weekly/yearly etc...
- Measure load time in any client and quickly see the slowest clients.
- Store any kind of Leaderboard, such as top writers, top readers, top countries your visitors come from.
- Anything that can be counted!
Here are some ways that we use it in FTBPro.com

General Overview
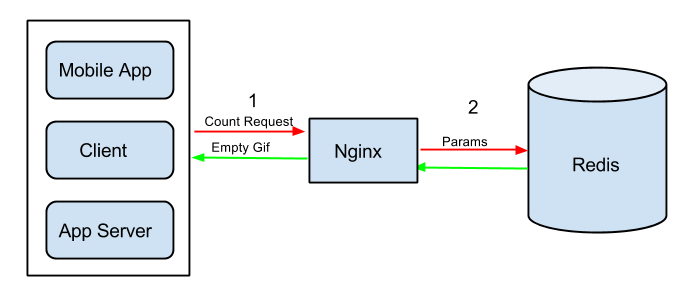
Count-von-Count is a web server that uses Redis as a database. When a client wants to report an action which should be counted, he initiates a request to the counting server: <server_ip>/<action_name>?<params>. The response is a 1X1 empty pixel, for reducing the overhead in calling it from JavaScript clients.
A configuration file, von_vount.config, which is defined in the server, sets the rules of the counting - what to update for each action. No coding is needed! The updates are synchronously committed to the database.
The sever also has an API for retrieving the data.
Installation
-
Install redis-server (apt-get install redis-server). You can also use one of your previously installed servers.
-
Download and install OpenResty. Use default settings and directory structure!
-
Clone count-von-count.
-
If you are not using Redis with its default settings (localhost, port 6379), update
config/system.configfile with the Redis server IP and port. -
Edit openresty's nginx.conf file (by default, it's in /usr/local/openresty/nginx/conf)
- add
worker_rlimit_nofile 30000;at the top level - add
include /usr/local/openresty/nginx/conf/include/*;under the 'http' section
#nginx.conf worker_rlimit_nofile 30000; http { include /usr/local/openresty/nginx/conf/include/*; . . . - add
-
After installation is complete, you need to set up the server.
If you are familiar with Ruby and Capistrano, you can skip this section and follow this - Deploy using Ruby & Capistrano
Run sudo ./lib/scripts/setup.sh. If the last 2 output lines are
     ~~~
     >>> nginx is running
     >>> redis-server is running
     ~~~

  then you should be good to go.
- For the first time and every time you modify the
voncount.configor the code - runsudo ./lib/scripts/reload.sh
Getting Started - Counting, It's easy as 1,2,3
Clients
Each request to the server should be in the following fromat: <server_ip>/<action_name>?<params>.
Browsers
Add an img element to your html document <img src=<server_ip>/<action_name>?<params>>. You can also load it using JavaScript.
Some browsers perform asset caching on images, so it's important to add to the request a parameter that changes from request to request, e.g, current time: <img src=<server_ip>/<action_name>?<param1=arg1>&<param2=arg2>&ts=<current_time>
Server Configuration
Now, after you've understood the general overview of how the system works, and you've installed & set up your server, you are ready to get your hands really dirty! :-)
The config/voncount.config file is the heart of the system, and determines what gets counted and how.
The file is written in standard JSON format, and for most use-cases changing it and customizing it to your needs is enough. You won't even need to write code!
We'll show here some examples that cover all the different options the system supports. Most of them are real life examples taken from our production environment.
But let's start with a simple example: Say that you have a blog site and you want to count the number of reads that each blog post gets. You need to take care of 2 things:
- In each post page, make a server call (via img src=... or javascript) - http://my-von-count.com/reads?post=3144 (3144 is a unique identifier of the current post).
- Set the following configration:
{
  "reads": {
    "Post": [
      {
        "id": "post",
        "count": "num_reads"
      }
    ]
  }
}
** Don't forget to run reload.sh script after you change the configuration! **
That's it! For each post that gets read, you'll have data in the Redis DB in the format of
Post_3144: { num_reads: 5772 }
To get the number of reads for post 3144 you can run redis-cli hget Post_3144 num_reads
Now let's see a general example for the most basic use case:
{
  "<ACTION>": {
    "<OBJECT>": [
      {
        "id": "<ID>",
        "count": "<COUNTER>"
      }
    ]
  }
}
With this configuration, we can make a call to http://my-von-count.com/<ACTION>?<ID>=1234, which will result in having a <OBJECT>_<ID> key in our Redis DB, with value { <COUNTER>: 1 }
Making the same call again will result in incrementing the value of <OBJECT>_<ID> to { <COUNTER>: 2 }
Counting Configuration
As mentioned earlier,config/voncount.config file is the heart of the system, and determines what gets counted and how. Let's go over the different configuration options.
Counting Options
To get you in context, here is a short description of our domain -
At FTBpro we have posts, users, and teams.
Each post is written by a user who is the author, and the post "belongs" to a team.
Simple Count
When a post gets read, we want to increase the number of reads the author has received.
{
  "reads": {
    "User": [
      {
        "id": "author",
        "count": "reads_got"
      }
    ]
  }
}
The top-most level of the configuration JSON keys is the action type that we want to count - reads.
User is the object for which we want to count the reads action.
id is the object (e.g. user's) id, and it should be defined in the query string parameters when making a call to the count-von-count server.
count is what we count/increase.
So, with the above configuration, when we make a call to http://my-von-count.com/reads?author=1234, then our Redis DB will have the following key:
User_1234: { reads_got: 1 }
Compared to the general example:
* <ACTION> = reads
* <OBJECT> = User
* <ID> = author
* <COUNTER> = reads_got
So given a reads <ACTION>, the reads_got <COUNTER> of the User <OBJECT> with <ID> equals to author's value, will be increased by one.
Notice - in voncount.config, the value of <ACTION> (reads) is a hash, and the value of the <OBJECT> (User) is an array of hashes.
Multiple Objects of The Same Type
Now let's add another counter: the number of posts a user has read.
That means that when a post gets read, we want to increase a counter for the author, like in previous example, and also increase a counter for the user who is now reading the post in order to know how many posts each user has read.
{
  "reads": {
    "User": [
      {
        "id": "author",
        "count": "reads_got"
      },
      {
        "id": "user",
        "count": "reads"
      }
    ]
  }
}
The one who is reading the post now is also a User, so we define it under the already existing User object.
The user's id is defined in the query string params as the user parameter and for him we count reads.
After a call to http://my-von-count.com/reads?author=1234&user=5678 our Redis DB will have the following keys:
User_1234: { reads_got: 2 }
User_5678: { reads: 1 }
Multiple Objects of Different Types
We also want to know how many reads each Post has received.
To do this, we add the following configuration for Post object under the reads action, and we add a 'post' id to the query string parameters.
{
   "reads": {
      "User": [
         {
           "id": "author",
           "count": "reads_got"
         },
         {
           "id": "user",
           "count": "reads"
         }
      ],
      "Post": [
         {
           "id": "post",
           "count": "reads"
         }
      ]
   }
}
After a call to http://my-von-count.com/reads?author=1234&user=5678&post=888, our Redis db will have the following keys:
User_1234: { reads_got: 3 }
User_5678: { reads: 2 }
Post_888: { reads: 1 }
Object With Multiple Ids
On FTBpro we are doing daily analytics.
For each user we want to know how many posts he has read each day.
We'll define a "UserDaily" object. Its id will be the user's id and the current date.
{
  "reads": {
   .
   .
   .
     "UserDaily": [
        {
           "id": [
              "user",
              "day",
              "month",
              "year"
           ],
           "count": "reads",
           "expire": 1209600
        }
    ],
Notice the <ID> of the UserDaily object is an array composed of 4 parameters, so after a call to
http://my-von-count.com/reads?user=5678, Redis DB will have the following keys:
UserDaily_5678_28_11_2013: { reads: 1 }
WAIT A SECOND! the query string contains only a user parameter. Where do the other 3 parameters (day, month, year) come from?!? Read more about it on Request Metadata Parameters Plugins.
Dynamic Count - Parameter as Name
We can use parameters to determine the <COUNTER> name. In that way we can dynamically determine what gets counted.
In this example, we count the number of reads an author had from each country (every week).
{
  "reads": {
   .
   .
   .
   "UserWeeklyDemographics": [
     {
       "id": [
         "author",
         "week",
         "year"
       ],
       "count": "{country}"
     }
    ]
You can see we are using the week and year parameters for the <ID> as in the example above, and also the country parameter as the <COUNTER> name.
The country parameter is explained under Request Metadata Parameters Plugins.
The data will be something like -
UserWeeklyDemographics_5678_42_2013: { US: 5, UK: 8, FR: 1 }
*It's possible to use a parameter name that is passed in the request query string (e.g. author, post, etc...), and not only the Metadata Parameters!
* <COUNTER> names can be be more complex. With we have a registered parameter in the request query string, in the config file we can define - "count": "from_{country}_{registered}"
Counting Several Actions
So far we've seen examples related to post reads, but users can also comment on posts.
Very similarly to the reads action, we also want to count:
* for each author - how many comments he received on his posts
* for each user - how many comments he wrote
* for each post - how many comments it received
On the voncount.config file, at the JSON's top level (not nested under the reads action!) we'll add -
{
  "reads": {
   .
   .
   .
  },

  "comments": {
    "User": [
      {
        "id": "user",
        "count": "comments"
      },
      {
        "id": "author",
        "count": "comments_got"
      }
    ],

    "Post": [
      {
        "id": "post",
        "count": "comments"
      }
    ]
   }
}
When making a call to count.com/comments?author=1234&user=5678&post=888, our redis DB will have the following keys:
User_1234: { comments_got: 1 }
User_5678: { comments: 1 }
Post_888: { comments: 1 }
Ordered Sets (Leaderboard) - Save The Counters Data in Order
In all previous examples, the data was saved as a Redis Hash type.
It is possible to save the data as an order set as well. In that way, your data can be sorted automatically. This is very useful for storing leaderboards.
For example, we want to know the "top 3 posts" (posts that got the most reads) in each day -
{
  "reads": {
   .
   .
   .
   "PostDaily": [
      {
        "type": "set",
        "id": [
          "day",
          "month",
          "year"
        ],
        "count": "post_{post}",
        "expire": 604800
      }
    ]
You can see we defined a type of "set". You can also define type as "hash", but this is the default option, so you can just skip this definition as in previous examples.
* We are using the post id as part of the <COUNTER> name, similar to Dynamic Count - Parameter as Counter Name
The data for this example will look like -
PostDaily_28_11_2013: {
post_888: 2,

post_53:  15,

post_932: 26,

...
}
The data is ordered, and you can retrieve it using Redis zrange and zrevrange commands, and - for the sake of our example - get the "top 3 posts" without fetching the entire set and doing your own sort on the values, but simply by - zrevrange PostDaily_28_11_2013 0 2
Later when we talk about retrieving data, we'll show how to retrieve data through the server, and without accessing Redis directly.
Advanced: Custom Functions - Writing Your Own Logic
You have the option to go crazy and implement more complex logics for your counters. To do that, you'll need to get your hands a bit dirty and write some Lua code.
In this example, we'll implement conditional count:
When a new post is created, we report a post_create action - http://my-von-count.com/post_create?user=1234, which increases the post_created counter for the user who wrote the post -
"post_create": {
  "User": [
    {
      "id": "user",
      "count": "post_created"
    }
  ]
Reminder - a post "belongs" to a team, and we want to know for each team how many posts it has,
BUT we want to count only posts that have at least 200 words.
When reporting the post_create action, we'll add the team parameter to the query string, and let's also add another parameter - long_post that will get "true" or "false" as values.
our call will look like - http://my-von-count.com/post_create?user=1234&team=10&long_post=true
the config file -
"post_create": {
  "User": [
    {
      "id": "user",
      "count": "post_created"
    }
  ],

  "TeamCounters": [
    {
      "id": "team",
      "custom_functions": [
        {
          "name": "conditionalCount",
          "args": [
            "{long_post}",
            "posts"
          ]
        }
      ]
    }
  ]
Now let's write the Lua code for this custom function in lib/redis/voncount.lua:
----------------- Custom Methods -------------------------

 function Base:conditionalCount(should_count, key)
   if should_count == "true" then
     self:count(key, 1)
   end
 end
What do we have here:
- conditionalCount is the name of our new custom function, and it must be equal to the "name" in the config.
- Our custom function received 2 arguments, which are defined by the "args" in the config:
* should_count will receive the value of the long_post parameter provided in the query string.
* key will always receive the same value - the string "posts"
- self:count(key, 1) - is a call to a different function - count - which is the basic count functionality and is already defined in the lib/redis/voncount.lua file. (self is the current instance of the Base class that defines the count function and our new conditionalCount custom function)
* Notice that the post_create count for the User object is not affected, and it always gets counted, even if the long_post parameter is "false".
The data will look like -
TeamCounters_7: { posts: 324 }
Variable Count - Not Just Increase by 1
In all previous examples we always increased the <COUNTER> by 1 with each call, but this doesn't have to be the case.
The system lets you decide the increment number using the change definition in the config file.
In example #8 we showed how we count for a user how many posts he created. When a post is deleted we want to decrease this counter. We'll define a post_remove action that will be resposible for this decrement:
"post_remove": {
   "User": [
     {
       "id": "user",
       "count": "post_created",
       "change": -1
     }
   ]
}
Notice we decrease the value of the "post_created" <COUNTER>
So if in the DB we have:
User_1234: { post_created: 5 } Then after a call to http://my-von-count.com/post_remove?user=1234, our data will be: User_1234: { post_created: 4 }
* change can have any integer value, not just 1 or -1!
Expire - setting TTL on Redis data
Those of you with a keen eye might have noticed that in examples #4 and #7 the configuration includes an expire definition.
You can put it on any <OBJECT> in the config, and it sets its TTL (time to live) in Redis. The value is in seconds (e.g. 1209600 = 2 weeks).
This is useful in order to keep the amount of data in the DB at a sane size, and also helps keep it clean from old irrelevant data that we may never need again.
The TTL is set on the first time the data is created in our Redis DB, and does not get extended when the data is updated!
Take a look at example #4 again. Let's assume the DB is empty.
After a call to http://my-von-count.com/reads?user=5678, our DB will have the following data -
UserDaily_5678_28_11_2013: { reads: 1 }
This data will have a TTL of 2 weeks.
If after 4 days we make another call to http://my-von-count.com/reads?user=5678, then our data will be
UserDaily_5678_28_11_2013: { reads: 2 }
but its TTL will be equal to only the remaining 10 days!
If we wait another 10 days, this data will be gone!
Request Metadata Parameters Plugins
Sometimes there is a need for the key names to consist of data that is not part of the request arguments, but is based on the request metadata. Currently, we support 2 types of this case: date_time parameters and the country parameter.
The Request Metadata Parameters works as a plugin mechanism. Enabling/disabling plugins can be done by adding/removing the plugin name in `lib/nginx/request_metadata_parameters_plugins/registered_plugins.lua'. Let's discuss the default plugins which come out of the box.
DateTime Plugin
| Parameter Name | Description |
|---|---|
| day | current day of the month |
| yday | day index of the year (out of 365) |
| week | week index of the year (out of 52). Weeks start and end on Mondays. |
| month | month index of the year (out of 12) |
| year | in 4-digit format |
Customization
The plugin comes with the arguments that we think are needed. If you want to add your own parameters, just update `lib/nginx/request_metadata_parameters_plugins/date_time.lua' with the relevant time format.
Country Plugin
This plugin is disabled by default. To enable it, uncomment 'country' in `lib/nginx/request_metadata_parameters_plugins/registered_plugins.lua' file.
| Parameter Name | Description |
|---|---|
| country | 2-letter country code according to the IP of the call |
Prerequisites
This plugin uses lua-geoip and thus the following steps are necessary for this plugin:
- Install LuaRocks (apt-get install luarocks)
- Install lua-geoip (luarocks install lua-geoip)
- Install Geoip (sudo apt-get install geoip-bin geoip-database libgeoip-dev)
- Make sure to update the geoip.dat. You can use the provided `lib\scripts\update-geoip.sh' script for it. Just add it to your crontab and schedule it to execute during off-hours.
Customization
You make your changes to lib/nginx/request_metadata_parameters_plugins/date_time.lua. For example, if you want to save the name of the country insted of its code, you can use geoip.name_by_id(id) method instad of geoip.code_by_id(id)
Retrieving Data
Retrieving data is possible through the count-von-count API or direct access to the Redis instance.
Get Key API
Simple Get
Accessing <counter_server>/get?key=<key_name> will return JSON containing all the fields of the given key. This works for both Redis Hashes and Sets. For example, Getting all counters for Post_1:
http://my-von-count.com/get?key=Post_1
 {
   reads: "10",
   likes: "3",
   shares: "1"
 }
Notice - you will not get zero values. For example, if you count a share action, but nobody has shared your post, then the result JSON will simply not have the "shares" key.
Attributes Get
Instead of getting all the existing key-value pairs of an object, you can query for specific attributes by passing an attr[] parameter in the request query string.
For example, if you want to get only the likes, shares and tweets count for Post_1 (without the reads):
http://my-von-count.com/get?key=Post_1&attr[]=likes&attr[]=shares&attr[]=tweets
 {
   likes: "3",
   shares: "1",
   tweets: null
 }
Notice -
- If you ask for an attribute that doesn't exist (or simply didn't get counts yet), the result will contain its key-value pair, as opposed to before, but with a
nullvalue, like for thetweetscounter above. - You can ask for a single attribute, without using the array syntax - http://counter.ftbpro.com/get?key=Post_1&attr=likes - and the result will be a simple number (or null) and not JSON!
Ordered Set - Get Range
When requesting the value for an ordered set, you can get all the results by providing only the key, like in the first example in this section, but you can also request a specific range. Here are some examples:
- top 5 (highest values) - http://my-von-count.com/get?key=PostDaily_28_11_2013&from=0&to=5
- last 5 (lowest values) - http://my-von-count.com/get?key=PostDaily_28_11_2013&from=-5&to=-1
- all values - http://my-von-count.com/get?key=PostDaily_28_11_2013&from=0&to=-1
- places 10 to 30 - http://my-von-count.com/get?key=PostDaily_28_11_2013&from=10&to=20
Notice the
toparameter in the query string has a bad name, it should actually be called something likeamount. In this example we ask for results from place 10, and we ask for 20 results! Giving a -1 value totois actually asking for the results fromfromuntil the end.
Results may look something like:
 {
  post_471049: "13787",
  post_473365: "8857",
  post_473813: "8181",
  post_472293: "14016",
  post_476298: "4127",
  post_464297: "9228"
 }
Notice - like stated in the 1st example, the result JSON is NOT ordered, since JSON has no guarantee about order of key-value pairs.
Advanced
Architecture
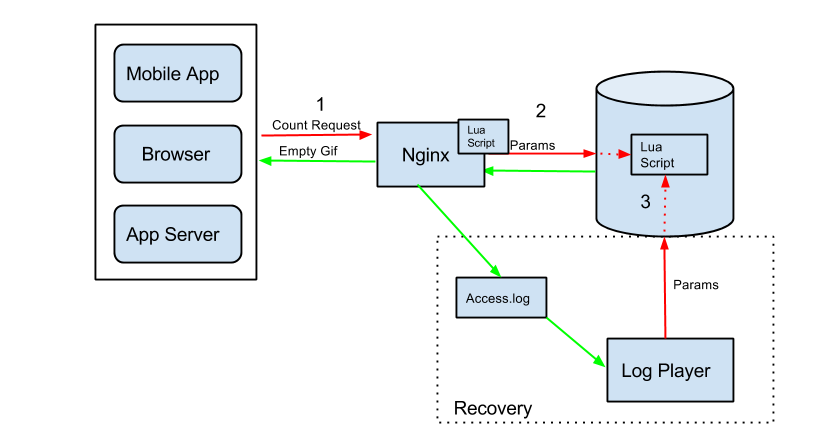
Count-von-Count uses OpenResty as a web server. It's basically a Nginx server, bundled with 3rd party modules. One of them is lua-nginx-module which adds the ability to execute Lua scripts in the context of Nginx. Another useful module is lua-resty-redis which we use to comminicate with Redis, the place where we store the data.
The flow of a counting request is:
- A client sends a request in the format of count_von_count_server/?params. When Nginx receives the request, a Lua script is executed. After the script finishes, an empty 1X1 pixel is returned to the client.
- This Lua script parses the query params from the request, adds additional params using the Request Metadata Parameters Plugins and calls Redis to evaluate a preloaded Lua script.
- The Redis script updates all the relevant keys according to the von_count.config configuration file.
- In case of a disaster, recovery is available through the Log Player.
Log Player
Count-von-count comes with a log player. It is very useful in cases of recovery after system failure or running on old logs with new logic. Its input is an access log file (a log file where the Nginx logs each incoming request). It updates Redis based on the voncount.config.
Deploy using Ruby and Capistrano
Edit deploy.rb file and set the correct deploy user and your servers' IPs in the deploy and env_servers variables.
For the first time run cap deploy:setup to bootstrap the server.
Use cap deploy to deploy master branch to production.
Use cap deploy -S env=qa -S branch=bigbird if you want to deploy to a different environment and/or a different branch.
Contributing
- Fork it
- Create your feature branch (git checkout -b my-new-feature)
- Commit your changes (git commit -am 'Added some feature')
- Push to the branch (git push origin my-new-feature)
- Create new Pull Request
Contact Us
For any questions, suggestions or feedback, feel free to mail us at:
Ron Schwartz - [email protected]
Shai Kerer - [email protected]


