A simple tutorial on a servlet that returns our object as a XML file. On this ReadMe file, you find: first a simple explanation of what is used and how it works; then a step by step guide of how it is build.
- Java;
- Maven to manage our dependencies;
- JAXB, a API to manipulate XML;
- JUnit for the tests;
- Java-CRUD a simple CRUD, java, maven project , that will be used as basis for this one. Consists of a class that handles our object, a persistence layer and a service class to manipulate that layer. Any doubt, the Java-CRUD ReadMe file explains all the workflow and classes involved on this project. The only diference with the fork from that project is that the _StepByStep TestClass was separated into smaller tests on src/test/java.
Extensible Markup Language, in a simple explanation: is a format that consists on hierarchical tags, that make it possible to encode documents in a way that is both human-readable and machine-readable, making it easy to transfer structured data on the web, between different applications.
Java Architecture for XML Binding.
Binding consists in two moves, Marshall and Unmarshall (as explained on the image).
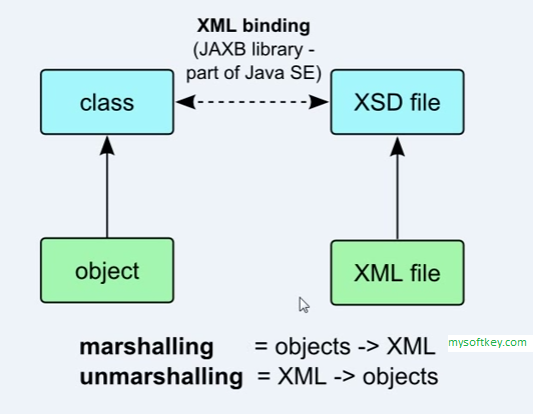
How it works: we make a JAXB Context with a instance, this instance is a class on our code with the JAXB annotations. Than we create a Marshall or a Unmarshall to process our object or Xml. If we want to transform one object into XML -> Marshall If we want to transform a XML into an object -> Unmarshall The XML is a instance of a XSD file, as the object is the instance of a class, and it is a part of the process as shown in the image.
-
First, to convert a object into xml, the JAXB needs a annotation statement, as said before, so we add "@XmlRootElement" into Plant.java. It's necessary to import javax.xml.bind.annotation.XmlRootElement.
-
JAXB can't encapsulate ArrayLists, so we will create a class called PlantList.java that handles it. And in this class it will be used two more annotations. In XML there is a schema called XSD, that is responsible for the hierarchy and separation of the elements/tags. Since we want to work with a List, we will creat the root element, that will be the list itself,so we use the @XmlRootElement annotation, and pass to it the parameter name Plants. Then inside the class, on the get method, we will create a @XmlElement, because the plant is the element of the List, and we pass a name parameter to it. Remebering that this class must be serializable. And at last will be overrided the toString() method, so it returns a formated PlantList string.
-
TEST, we create a test for the PlantList.
-
Creating the class to handle JAXB.
- Create a package util.
- Create a JAXBUtil class.
-
TEST, inside src/test/java we create another util package as we did on the main src. And inside it a test for our JAXBUtil class.
-
Before creating our servlet class, we will create another class inside the util package ServletUtil. This class will be responsible to write our xml into the HTTP response, so it helps our Servlet. It will be simpler to understand this class when the servlet code be ready. (if you don't have the javax.servlet API you can add as exteral jar on Build Path or, since we are using maven, add as a dependency, as it is on this project).
-
Now create a servlet package on the main src.
- Inside it, we create our servlet: a class called PlantServlet.
- This class will be key on our project, because it will do all the procedure, get the plants on the data base, transform into the XML and pass it to the browser.
- Notice the @WebServer annotation, it will be the responsible for activating this class.
-
Before running our servlet, add a index.jsp into WebContent (Maven Architecture), so you can test if your server(Tomcat, GlassFish...) is running correctly.
-
One more step so we can run our servlet on the server, we need to add the maven dependncies to the Web layer of our project, its pretty simple:
- Project > Properties > Deployment Assembly: There click "add", select "java build path entries", and choose "maven dependencies". This will instruct WTP to send the maven dependencies to the server dir.
-
Now everything is ready, we can run our project on the server. Reminder: the url to acces the xml it will be http://localhost:8080/Servlet-XML/AllPlants

