bjdgyc / anylink Goto Github PK
View Code? Open in Web Editor NEWAnyLink是一个企业级远程办公 ssl vpn 软件,可以支持多人同时在线使用。基于 openconnect 协议开发,并且借鉴了 ocserv 的开发思路,可以完全兼容 AnyConnect 客户端。
License: GNU Affero General Public License v3.0
AnyLink是一个企业级远程办公 ssl vpn 软件,可以支持多人同时在线使用。基于 openconnect 协议开发,并且借鉴了 ocserv 的开发思路,可以完全兼容 AnyConnect 客户端。
License: GNU Affero General Public License v3.0


![dependabot[bot] avatar](https://avatars.githubusercontent.com/in/29110?v=4 "dependabot[bot]")


绿盟扫描发现高危漏洞

请问该漏洞可否修复
如果不配置dns,域名解析就无法正常工作
anyconnect:登录速度慢,每次登录都会去检查更新。
openconnect-gui:登录速度快,但可以无CA证书情况下登录,不安全,登录后使用的是server的MAC地址

导致只能访问anylink服务器这一个ip,其他地址不能访问

这个地方可否从配置文件中获取?
github地址:https://github.com/bjdgyc/anylink
gitee地址:https://gitee.com/bjdgyc/anylink
阿里云ECS,内网网段172.24.128.0/20,使用tun模式,自签证书,0.7.2版本
| 名称 | 公网IP | 内网IP | 系统 |
|---|---|---|---|
| ECS01 | 47.108.53.88 | 172.24.135.36 | centos7.5 最小安装 |
| ECS02 | 无 | 172.24.135.37 | centos7.5 最小安装 |
ps: ECS02只是用于测试使用,我在上面安装了一个nginx用于测试访问web是否正常
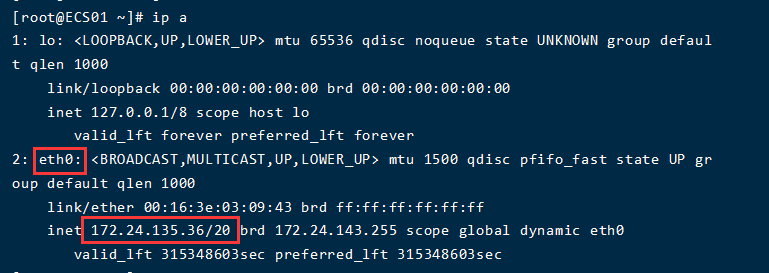
在要安装anylink的服务器上,查看内网ip地址所绑定的网卡名,本次演示环境网卡名称为eth0
anylink需要一个端口供客户端远程连接,这里选择默认的443,并且还需要一个端口用于访问web管理后台,这里也选择默认的8800,如果有需要请自行更换,因为云服务器默认关闭了selinux和firewalld,使用安全组,所以需要在安全组上开放内网网段和两个公网访问端口(443和8800)即可。

如果你是本地机房也需要开放一个公网IP地址+端口供客户端远程连接,并且关闭selinux和firewalld
关闭selinux
sed -i 's/SELINUX=enforcing/SELINUX=disabled/' /etc/selinux/config # 永久关闭selinux(重启后生效)
setenforce 0 # 临时关闭selinux(不需要重启,立即生效)
关闭firewalld
systemctl stop firewalld # 临时关闭防火墙
systemctl disable firewalld # 永久关闭防火墙下载anylink,本教程指定下载0.7.2版本,下载地址https://github.com/bjdgyc/anylink/releases/download/v0.7.2/anylink-deploy.tar.gz,用浏览器下载好后上传到服务器ECS01
SSH到服务器ECS01,解压二进制包到/usr/local目录
tar -xzvf anylink-deploy.tar.gz -C /usr/local/进入anylink目录
cd /usr/local/anylink-deploy生成密码1q2w%3e4r的密文,请修改为你自己要设置的密码
注意密码不能有
$符号,会被当成变量,也可以用单引号包起来
./anylink tool -p 1q2w%3e4r
生成jwt密钥
./anylink tool -s
进入conf配置目录
cd conf拷贝配置文件模板
cp server-sample.toml server.toml打开配置文件
vi server.toml修改如下部分,其他保持不变:
#示例配置信息

#其他配置文件,可以使用绝对路径
#或者相对于 anylink 二进制文件的路径

#数据文件
db_type = "sqlite3"
db_source = "./conf/anylink.db"
#证书文件 使用跟nginx一样的证书即可
cert_file = "./conf/vpn_cert.pem"
cert_key = "./conf/vpn_cert.key"
files_path = "./conf/files"
profile = "./conf/profile.xml"
#日志目录,为空写入标准输出
log_path = "./log" # 添加日志文件路径
log_level = "info" # 修改日志等级为info
pprof = false

#系统名称
issuer = "anylink vpn" # 修改系统名称
#后台管理用户
admin_user = "admin"
#pass 1q2w%3e4r   你可以将明文密码写在这里,不建议
admin_pass = "$2a$10$lvOe.X6VFL/.uf/pN4q8CezUVViovYh2zT9UdeReuscNBEZz.WATm" # 填入第4步生成的密文
jwt_secret = "iYP8MCJ0nswI2p0bMN6wnkQ2aVJxS_tg5rNX8NVcitqj3OferWzUZXNX1OvV" # 填入第5步生成的jwt密钥


#服务监听地址
server_addr = ":443" # 客户端要连接的端口,如果有需要请自行修改,安全组记得开放该端口
#开启 DTLS, 默认关闭
server_dtls = false
server_dtls_addr = ":4433"
#后台服务监听地址
admin_addr = ":8800" # 后台管理端口
#开启tcp proxy protocol协议
proxy_protocol = false

link_mode = "tun"  # 网络模式,只演示该模式,其他模式请自行参考github

#客户端分配的ip地址池
ipv4_master = "eth0" # 网卡名,前面查看绑定内网的网卡名称
ipv4_cidr = "192.168.10.0/24" # 如果没有和内网网段冲突就不要改了,这个是分配给客户端的ip地址池,并且后面配置nat也要与这个地址池保持一致
ipv4_gateway = "192.168.10.1"
ipv4_start = "192.168.10.100"
ipv4_end = "192.168.10.200"

#最大客户端数量
max_client = 100
#单个用户同时在线数量
max_user_client = 3
#IP租期(秒)
ip_lease = 1209600

#默认选择的组
default_group = "one"

#客户端失效检测时间(秒) dpd > keepalive
cstp_keepalive = 20
cstp_dpd = 30
mobile_keepalive = 40
mobile_dpd = 50
#session过期时间,用于断线重连,0永不过期
session_timeout = 3600
auth_timeout = 0
audit_interval = -1创建日志文件目录,请修改为自己配置的日志路径,不创建会启动失败,如果没有打开日志输出,可以跳过
mkdir /usr/local/anylink-deploy/log打开profile.xml文件
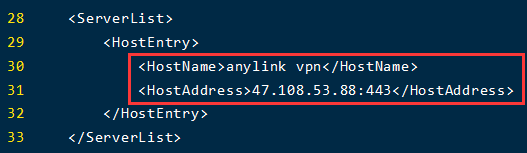
vi profile.xml12. 修改如下配置 (这步可以不设置)
```shell
<HostName>anylink vpn</HostName> # 第30行,最好与server.toml配置文件中的系统名称保持一致,用于客户端区分
<HostAddress>47.108.53.88:443</HostAddress> # 第31行,客户端连接地址,域名加端口,或者IP加端口
```
你可以购买证书或者使用免费的证书,这里使用自签证书,根证书和根私钥生成一次后,可以保留,给所有项目使用,就不用重复信任根证书了
创建配置文件,请修改为自己IP地址和域名
cat > openssl.cnf << EOF
# ca根证书配置
[ ca ]
subjectKeyIdentifier=hash
authorityKeyIdentifier=keyid:always,issuer
basicConstraints = critical,CA:true

# HTTPS应用证书配置
[ crt ]
subjectKeyIdentifier = hash
authorityKeyIdentifier=keyid:always,issuer
basicConstraints = critical, CA:false
keyUsage = critical, digitalSignature, cRLSign, keyEncipherment
extendedKeyUsage = critical, serverAuth, clientAuth
subjectAltName=@alt_names

# SANs可以将一个证书给多个域名或IP使用
# 访问的域名或IP必须包含在此,否则无效
# 修改为你要保护的域名或者IP地址,支持通配符
[alt_names]
IP.1 = 47.108.53.88 # 公网IP地址
DNS.1 = anylink.com # 访问的域名,没有域名可以删掉
EOF
生成根私钥
openssl genrsa -out root.key 4096生成根证书请求文件
C:所在国家 (Country),只能是两位字母缩写
ST:所在省份(State)
L:所在城市(Locality)
O:所在组织(Organization)
OU:所在部门(Organization Unit)
CN:公用名,即域名(Common Name)
openssl req -new -key root.key -out root.csr -subj "/C=CN/ST=Sichuan/L=Chengdu/O=anylink/OU=anylink/CN=anylink.com"生成根证书
-req: 证书请求
-extfile:扩展文件配置和-extensions参数使用
-extensions:扩展配置
-in:证书请求文件
-out:证书输出文件
-signkey:签名的私钥
-days:有效期
openssl x509 -req -extfile openssl.cnf -extensions ca -in root.csr -out root.crt -signkey root.key -CAcreateserial -days 3650生成vpn的私钥
openssl genrsa -out vpn_cert.key 4096生成vpn证书的请求文件
openssl req -new -key vpn_cert.key -out vpn_cert.csr -subj "/C=CN/ST=Sichuan/L=Chengdu/O=anylink/OU=anylink/CN=anylink"签发vpn证书
openssl x509 -req -extfile openssl.cnf -extensions crt -CA root.crt -CAkey root.key -CAserial vpn_cert.srl -CAcreateserial -in vpn_cert.csr -out vpn_cert.pem -days 3650删除多余的中间文件,删除后,应该剩下root.crt、root.key、vpn_cert.pem、vpn_cert.key这4个文件
rm -rf root.csr vpn_cert.csr vpn_cert.srl openssl.cnf
拷贝根证书到files文件夹下,供客户端下载
cp root.crt files/开启服务器ipv4转发
echo "net.ipv4.ip_forward=1" >> /etc/sysctl.conf立即生效
sysctl -p
设置nat,请替换网卡名称为前面查看的内网网卡名称,另外,如果server.toml文件里面客户端的IP地址池不是默认的192.168.10.0/24,也请修改为对应的IP地址池
iptables -t nat -A POSTROUTING -s 192.168.10.0/24 -o eth0 -j MASQUERADE查看设置是否生效
iptables -nL -t nat
安装iptables-services,用于保存iptables配置,永久生效
yum install -y iptables-services设置开机自启
systemctl enable iptables.service保存当前iptables设置
service iptables save
复制service文件到系统中
cp /usr/local/anylink-deploy/systemd/anylink.service /usr/lib/systemd/system/启动anylink
systemctl start anylink
systemctl enable anylink
查看启动状态
systemctl status anylink
访问地址公网IP+端口(默认8800),输入账号(admin)和 密码(1q2w%3e4r)点击登陆
http://47.108.53.88:8800
添加邮箱配置,这里用QQ邮箱演示,其他邮箱请自行百度,另外密码是不是QQ密码,是授权码,不清楚也请百度

设置邮件内容

添加用户组

再添加一个测试组,来测试一下访问权限

添加用户zhangsan

添加用户lisi
建议所有用户使用统一的PIN码+OTP的方式登陆,这里为了演示,使用了不同的PIN码,PIN码是固定的,用户无法自行更改不要设置太复杂了哈

查看邮件


你可以将各种客户端安装包和使用教程放入
/usr/local/anylink-deploy/conf/files目录下,然后在邮件里面写入下载地址供用户下载,邮件里面默认的info.txt文件也是对应该文件夹下的info.txt,客户端在压缩包里面,也可以去QQ群里下载,或者自行百度下载
压缩包文件:
FreeOTP.apk 安卓OTP软件安装包,ios请自行在应用商店下载,无法提供安装包
anyconnect-win-4.10.00093.msi win10 anyconnect安装包
anyconnect-macos-4.10.00093.dmg mac anyconnect安装包
anyconnect-4.9.06048.apk 安卓 anyconnect安装包
anyconnect-linux64-4.10.04065.tar.gz linux anyconnect安装包
此项是非必须的,如果开通用户时,禁用了OTP(一次性密码,每隔30秒更换一次动态密码),就不需要安装
安装客户端anyconnect,双击下载的安装包,点击Next按钮

选择我同意,在点击Next

点击Install

点击Finish

温馨提示:不要轻易信任一个未知来源的根证书,会有安全风险
浏览器下载根证书
如果下载后,找不到文件,可能被防火墙或者其他安全软件删除了
https://47.108.53.88:443/files/root.crt双击证书安装

选择本地计算机

选择受信任的根证书颁发机构

点击完成

浏览器访问验证
如果还是提示不安全,关掉浏览器,重新访问试试
https://47.108.53.88:443/
双击运行anyconnect,在启动项里有快捷方式
默认安装路径C:\Program Files (x86)\Cisco\Cisco AnyConnect Secure Mobility Client

输入邮件收到的连接地址,点连接

输入用户和密码,PIN码是在创建用户的时候设置的,邮件上也有,后面6位670160是手机OTP软件上扫描二维码后的6位动态码,手速要快哈

这个提示可以在管理后台邮件内容那里修改哈

连接成功

ping内网试试

浏览器访问ECS02上的nginx服务

断开连接,登录过一次后,客户端会保留上次的连接配置,配置名称对应profile.xml文件中的HostName,连接地址对应HostAddress,详见安装和配置的第12步,注意目前只能保存一个配置,不知道为什么

使用李四的账号登录,注意OTP软件,同一个邮箱同一个anylink服务端,只能保存一个账号的动态码,这里是我是将张三的动态码删除,再扫描李四的动态码,如果你实在需要一个anylink服务端使用同一个邮箱,你可以在后台将两个账号的OTP密钥设置成一样的

ping测试,符合测试组的权限,只能访问ECS01(172.24.135.36)

另外你可以查看一下自己电脑的IP地址,会发现正是server.toml配置文件中IP地址池中的地址,并且在服务器上,也自动创建了一张网卡,网卡IP地址跟你电脑上的一样


没有mac,图片网上截的,可能不清晰,也没有验证
双击下载的安装包,然后双击如下图标

然后点击继续按钮

再点击继续按钮

弹框处点击同意按钮

安装类型只选择 VPN 即可,然后点击继续

然后点击安装

验证账号密码,点击安装软件

成功安装后如图

温馨提示:不要轻易信任一个未知来源的根证书,会有安全风险
浏览器下载根证书
https://47.108.53.88:443/files/root.crt双击钥匙串访问,选择系统选项,点击加号,找到找到证书文件

选中证书文件,点击打开

双击导入的证书文件,将信任项修改为始终信任

点击证书文件的小三角,然后双击专用秘钥

修改访问控制项为允许所有程序访问

参考win10吧
温馨提示:不要轻易信任一个未知来源的根证书,会有安全风险
另外也可以在设置里面去掉阻止不信任的服务器勾选,然后连接时选择导入并保存证书
浏览器下载根证书
https://47.108.53.88:443/files/root.crt点击证书安装

设置证书名称

打开app,点击连接

添加连接

设置连接地址

点击连接

连接成功


这里以centos7.5为演示,其它linux系统类似
下载安装包
创建目录
mkdir /usr/local/anyconnect解压到目录
tar -xzvf anyconnect-linux64-4.10.04065.tar.gz --strip-components=1 -C /usr/local/anyconnect进入安装目录
cd /usr/local/anyconnect/vpn开始安装
./vpn_install.sh
温馨提示:不要轻易信任一个未知来源的根证书,会有安全风险
下载根证书
wget --no-check-certificate https://47.108.53.88:443/files/root.crt
移动根证书到受信任的证件夹下并重命名
不同linux系统,信任根证书的路径可能不一样请自行百度
cp root.crt /etc/pki/ca-trust/source/anchors/anylink-ca.crt更新信任证书列表
update-ca-trust
连接vpn
/usr/local/anyconnect/vpn/vpn connect 47.108.53.88:443
查看连接状态
/usr/local/anyconnect/vpn/vpn -s stats
ping测试

断开连接
/usr/local/anyconnect/vpn/vpn -s disconnect 47.108.53.88:443
编译安装需要
golang >= 1.16和nodejs >= 14.x环境
下载golang,本教程指定下载1.17.5,更多版本请访问https://studygolang.com/dl
wget https://dl.google.com/go/go1.17.5.linux-amd64.tar.gz解压到目录
tar -xzvf go1.17.5.linux-amd64.tar.gz -C /usr/local打开环境变量文件
vi /etc/profile在末尾添加如下变量
export GO_HOME=/usr/local/go
export PATH=$PATH:${GO_HOME}/bin
立即生效
source /etc/profile查看版本
go version
下载nodejs,本教程指定下载16.13.1,更多版本请访问https://nodejs.org/zh-cn/
wget https://nodejs.org/dist/v16.13.1/node-v16.13.1-linux-x64.tar.xz创建安装目录
mkdir /usr/local/nodejs解压到目录
tar -xvf node-v16.13.1-linux-x64.tar.xz --strip-components=1 -C /usr/local/nodejs/打开环境变量文件
vi /etc/profile末尾修改为如下
export GO_HOME=/usr/local/go
export NODEJS_HOME=/usr/local/nodejs
export PATH=$PATH:${GO_HOME}/bin:${NODEJS_HOME}/bin
立即生效
source /etc/profile查看版本
node -v
下载源码包https://codeload.github.com/bjdgyc/anylink/tar.gz/refs/tags/v0.7.2,本教程指定下载0.7.2,下载好了上传到服务器
解压包
tar -xzvf anylink-0.7.2.tar.gz进入目录
cd anylink-0.7.2编译
sh build.sh编译好后,将部署文件移动到/usr/local目录下
mv anylink-deploy /usr/local剩下的步骤请参考二进制包安装了
连接时间到了指定间隔时间(例如30分钟,1小时,3小时,12小时,等等),再次验证OTP
感谢anylink这么棒的项目!
最近在使用中,发现链接速度大部分时间在30-40Mbps, 偶尔60Mbps,请问怎么做能提高性能呢? 测试过程中服务器是1G带宽,1核心,最高CPU占用50%。
ocserv 支持站点到站点,群主和群里各位贡献者考虑下这个功能了
自动化管理希望支持一下IPv6,给客户端分配v6地址
1、建议PIN码直接改为密码,如果管理员给用户开启了OTP认证,只有用户和密码登陆成功后,才能进行OTP认证,不然公司的那些小白用户,他们是搞不清楚登陆密码为【PIN码+动态码】是什么意思的
2、建议后台管理帐号也能增加OTP认证功能
3、建议审计日志有查询过虑条件, 不然日志大多,根本没办法看
加紧开发完剩余功能吧
致项目作者:
感谢作者的项目,望项目越来越好越来越完美!
首页在线人数统计曲线什么时候完成?
集成配置文件自动生成,证书自动生成,iptables自动更新.
docker run -d --privileged=true --name anylink -p 443:443 -p 8800:8800 -v /path/you/dir:/app/conf jonnyan404/anylink
打开 http://IP:8800 访问后台
有问题,欢迎跟帖反馈!
对于内网设备,需要进行端口映射。请问服务监听的端口是多少?
环境:
OS: centos 7.9 2009 latest
git clone 最新得 master 代码 (2021年-1月-11号 周一)
安装的 golang 版本:
golang-1.15.5-1.el7.x86_64
golang-bin-1.15.5-1.el7.x86_64
golang-src-1.15.5-1.el7.noarch
按 README一路编译正常 , 运行后,前台 https://sslvpn.xxx.org 访问正常 ( 输出 hello world ),
访问 http://sslvpn.xxx.org:8800/ui/ 后台页面 ,直接报 404
日志无任何新增输出信息 ,log_level info 调为 debug 测试依旧无新增输出信息
server.toml 配置文件
#其他配置文件,可以使用绝对路径
#或者相对于server.toml的路径

#数据文件
db_file = "./data.db"
#证书文件
cert_file = "./sslvpn.pem"
cert_key = "./sslvpn.key"
ui_path = "../ui"
down_files_path = "../down_files"

log_level = "debug"

#系统名称
issuer = "xxx sslvpn"
#后台管理用户
admin_user = "root"
#pass 123456
admin_pass = "$2a$10$/ZKjHF1Gtx40/S9DP29WkO/VmHq2Q0usRcsHUqey7T1cjD040vre2"
jwt_secret = "0c0Jy9fY47upxjwoea33DxvRN4TGdqD0YxjCcd9MwXuAjJVwc3280tBAuK4yw-ezqFqV"


#vpn服务对外地址
link_addr = "sslvpn.xxx.org"

#前台服务监听地址
server_addr = ":443"
#后台服务监听地址
admin_addr = ":8800"
#开启tcp proxy protocol协议
proxy_protocol = false

link_mode = "tun"

#客户端分配的ip地址池
ipv4_network = "5.5.5.0"
ipv4_netmask = "255.255.255.0"
ipv4_gateway = "5.5.5.1"
ipv4_pool = ["5.5.5.10", "5.5.5.20"]

#最大客户端数量
max_client = 100
#单个用户同时在线数量
max_user_client = 3
#IP租期(秒)
ip_lease = 1209600

#默认选择的组
default_group = "one"

#客户端失效检测时间(秒) dpd > keepalive
cstp_keepalive = 20
cstp_dpd = 30
mobile_keepalive = 50
mobile_dpd = 60
#session过期时间,用于断线重连,0永不过期
session_timeout = 3600
auth_timeout = 0```
build 了 0.4.1 docker 镜像测试后,发现默认启动后 data.db 和 证书文件默认 转移到 /app 目录下.
即使挂载 server.toml 到 /app/conf/ 下,同时 server.toml 中的相关路径也都是默认 ./data.db ./xxx.pem .但是相关文件实际上还是必须在 /app 下才能生效.
不太清楚这是bug还是因为改版需要把 data.db和证书提到 /app 目录...如果是这样,那么 server.toml 也应该放在 /app 才对.
但是建议还是和早前 0.3.3 版本那样规划比较科学,方便挂载整个/app/conf目录持久化存储 配置文件,数据库和证书文件.
毕竟app目录下有程序和脚本文件,不方便挂载目录,而单独挂载配置文件,数据库和证书文件,又太多了..比较繁琐
适合多host使用场景,同步配置
profile 的内容每个服务器可能不一样,需要自定义,不应该写死,应该在配置文件里定义文件路径,并动态读取返回给客户端
在安装体验了anylink软件后,提出以下建议:
1、 安装简单化,参考宝塔安装方法 安装脚本要做好一键安装部署自动加启动项,自动启动软件。
2、 配置简单化,安装完成后就可以通过WEB登录,对anylink系统的设置,建议增加配置向导,包括证书的生成,或者证书的导入,用户的管理 包括 用户设置 添加修改删除 启用 禁用 IP绑定
3、 系统的监控,
4、 审计日志
链接vpn后无法访问域名网页,输入ip可以访问,但是输入域名无法访问,使用cmd域名解析也是正常的,就是浏览器输入域名打不开网页,显示域名无法解析,初步怀疑室mtu导致的,能否提供一个如果修改mtu的方法
DumpHome: GET / HTTP/1.0
Host: 127.0.0.1
Connection: close
Connection: Close
Content-Length: 0
User-Agent: Cisco AnyConnect VPN Agent for Windows 4.9.04053
User-Agent: AnyConnect Agent 4.9.04053
X-Transcend-Version: 1
环境
最新master代码编译
创建用户时,勾选发送邮件按钮,点击保存,无响应,过几秒服务端日志就提示超时了
smtp 相关设置的域名,在同机器上进行 ping / telnet 25 port ,dns 解析等操作都是正常的, 确认anylink 到 smtp server 链路是通的
后台里的邮件设置(为了截图临时改值,由 xxx.cn 代替)

服务端日志报错
2021/01/12 14:21:46 main.go:26: [Info] Server pid:  3470
2021/01/12 14:21:46 server.go:47: [Info] listen server :443
2021/01/12 14:21:46 server.go:58: [Info] Listen admin :8800

2021/01/12 14:22:30 common.go:96: [Error] Mail Error: SMTP Connection timed out
2021/01/12 14:22:34 common.go:96: [Error] Mail Error: SMTP Connection timed out
环境:
桌面 OS : Windows 10
vpn客户端 cisco anyconnect 版本 v4.9.04043
作为对比,同样是这个客户端,连另一台 VPN 服务端 OpenConnect server (ocserv 1.1.1)登录正常
客户端报错
cisco anyconnect 输入 pin + OTP 动态码后 ,Banner信息弹出正常 ,但下一步就报错了

服务端日志输出
2021/01/12 10:04:48 main.go:26: [Info] Server pid:  2027
2021/01/12 10:04:48 server.go:47: [Info] listen server :443
2021/01/12 10:04:48 server.go:58: [Info] Listen admin :8800
2021/01/12 10:05:30 link_tunnel.go:69: [Debug] 192.168.214.10 02:00:ac:1a:05:0e demo
2021/01/12 10:05:30 link_cstp.go:54: [Debug] DISCONNECT 192.168.214.10
2021/01/12 10:05:30 closeOnce: 192.168.214.10
非常喜欢这个项目,也是sslvpn国内为数不多的精品,但是粗略看了下,目前有2个点可以重点考虑下
1,引用的github.com/songgao/water已经3年没有更新了,这个也是项目的核心
2,客户端用的是Cisco的客户端,是否可以使用开源的客户端或者实现通用通信协议标准的客户端,这样可以独立更新
预祝,后续生态繁荣壮大
功能请求:审计日志建议接入syslog
可视化的管理界面比ocserv好用,但是Anyconnect客户端不能保存密码,每次登录要输入6位数以上的密码也挺麻烦的,希望能够支持证书免密登录。
我希望控制一个用户每个月流量上限为100g, 请问目前anylink是否支持此功能
使用anyconnect连接后,所有的域名解析都会从vpn通道请求,会导致请求网站很慢,如果禁用anyconnect分配dns地址的优先级
https://blog.oasisfeng.com/2010/05/25/solve-the-dns-priority-issue-in-cisco-anyconnect-vpn-client/
anylink 作为一款亲民的SSL VPN软件,能与公司的LDAP 统一管理是不错的选择,建议开发SSL VPN+radius+ldap 满足账号授权问题。同时呢,也建议anylink 越来越精简。通过一系列的优化技术(如流压缩、流缓存、TCP协议代理等)提升用户的系统访问速度,增加用户体验。行为记录、展示及回溯:详细记录接入用户的访问行为,确保用户的访问过程可追溯加密算法有效性:根据不同业务的安全级别,提供AES、3DES、RSA、RC4、MD5及国密SM1、SM2、SM3、SM4等加密算法进行选择,保障数据的安全性
增加功能:用户批量添加
anylink使用的是v0.6.2
openconnect版本
[root@ecs-zPBqW ~]# openconnect --version
OpenConnect 版本 v8.10
Using GnuTLS 3.3.29. Features present: TPM, PKCS#11, RSA software token, HOTP software token, TOTP software token, Yubikey OATH, DTLS, ESP
支持的协议: anyconnect(默认), nc, gp, pulse
openconnect日志
[root@ecs-zPBqW ~]# echo "password" | openconnect -u username --passwd-on-stdin xxxx.com
POST https://xxxx.com/
已连接到 xxx.xxx.xxx.xxx:xxxx

SSL 与 xxxx.com 协商
Connected to HTTPS on xxxx.com with ciphersuite (TLS1.2)-(ECDHE-RSA-SECP256R1)-(AES-128-GCM)
XML POST 已启用
请输入你的用户名和密码
GROUP: [xxxx]:xxxx
POST https://xxxx.com/
XML POST 已启用
请输入你的用户名和密码
POST https://xxxx.com/
得到了 CONNECT 响应:HTTP/1.1 200 OK
未接收到 MTU。正在中止
创建 SSL 连接失败
想请加下为什么不能使用自签领证书的问题,如果可以使用自签名证书+仅域名绑定(动态IP)那就太好了
建议增加一个账号安全的功能,主要为自动检测多久未登录的账号自动禁用,功能如下:
Error parsing reference: "node:lts-alpine as builder_node" is not a valid repository/tag: invalid reference format
官方原配置文件为:
#客户端分配的ip地址池
ipv4_master = "eth0"
ipv4_cidr = "192.168.10.0/24"
当改为:
#客户端分配的ip地址池
ipv4_master = "eth0"
ipv4_cidr = "192.168.100.0/24"
的时候,启动docker,
默认的转发还是
MASQUERADE all -- 192.168.10.0/24 0.0.0.0/0
希望后续能修正为自动根据这个网段自动修改转发
1、安装简化。最好做成一键脚本安装,带SSL自动申请证书
2、加入ikev2 支持。这样windows , mac , iphone 都有默认软件支持。
3、加入LDAP功能。很多公司都是用LDAP 绑定GITLAB, DOC, FILE 这样的功能的。不然要二套系统
由于 客户端连接的IP 经过 NAT 转换后 到达后端服务器上 显示都是VPN server的 IP ,无法进行 追踪和溯源
建议增加flannel 网络管理支持 ,
在 vpn server上启动了 flannel 服务,会有个flannel tun网卡
然后启动 vpn server 使其tun 网卡的网段和flannel的tun网段 一致,类似docker 使用flannel网卡 那样
这样客户端分配的IP 地址都是flannel 网络的子网IP, 如下图中所示

目前是 登陆密码为 【PIN码+动态码】
希望能增加先输入PIN码,认证ok再密码二次认证,再加上ldap接入,我就可以在公司推广使用了。
1、前端界面每日在线统计和每日流量统计为什么显示的都是2019年,我看了我的机器时间是正确的;
2、审计日志里面没有数据;
3、用户组的radius认证服务器只能添加一个,能否实现可以添加两个radius服务器;
希望可以增加个用户组可以自定义不同子网网段的功能,多谢了
server: 0.62
client:anyconnect-win7-4.7.04056
连接报

错
偶然发现这么好的项目,也期望anylink可以支持 Dynamic Split Tunneling 功能,根据域名分流,让企业VPN更加实用,非常感谢!
hi.
root@p1601860745:~/anylink# ./build.sh
++ pwd
npm ERR! A complete log of this run can be found in:
npm ERR! /root/.npm/_logs/2021-06-18T09_52_53_279Z-debug.log
[email protected] build
vue-cli-service build
sh: vue-cli-service: command not found
怎么解决?
建议增加ldap账号对接
客户端连接 一直显示这个 头痛

A declarative, efficient, and flexible JavaScript library for building user interfaces.
🖖 Vue.js is a progressive, incrementally-adoptable JavaScript framework for building UI on the web.
TypeScript is a superset of JavaScript that compiles to clean JavaScript output.
An Open Source Machine Learning Framework for Everyone
The Web framework for perfectionists with deadlines.
A PHP framework for web artisans
Bring data to life with SVG, Canvas and HTML. 📊📈🎉
JavaScript (JS) is a lightweight interpreted programming language with first-class functions.
Some thing interesting about web. New door for the world.
A server is a program made to process requests and deliver data to clients.
Machine learning is a way of modeling and interpreting data that allows a piece of software to respond intelligently.
Some thing interesting about visualization, use data art
Some thing interesting about game, make everyone happy.
We are working to build community through open source technology. NB: members must have two-factor auth.
Open source projects and samples from Microsoft.
Google ❤️ Open Source for everyone.
Alibaba Open Source for everyone
Data-Driven Documents codes.
China tencent open source team.