card-mod 3
Allows you to apply CSS styles to various elements of the Home Assistant frontend.
Installing
Install using HACS or see this guide.
Performance improvements
While card-mod can be installed as a lovelace resource, some functionality will benefit greatly from it being installed as a frontend module instead.
To do that, add the following to your configuration.yaml file and restart Home Assistant:
frontend:
  extra_module_url:
    - /local/card-mod.js
You'll need to adjust that path according to where you have installed card-mod.js. If you installed through HACS, this is probably /hacsfiles/lovelace-card-mod/card-mod.js.
Quick start
- Open your card in the GUI editor
- Click the "SHOW CODE EDITOR" button at the bottom
- Add the following to the bottom of the code:
card_mod:
  style: |
    ha-card {
      color: red;
    }
You should see the text of the card turn red as you type.
You should also see a little brush icon popping up near the "SHOW VISUAL EDITOR" button. This indicates that this card has card-mod code which will not be shown in the visual editor.

Usage
Styling cards
Cards are styled by adding a card_mod parameter to the card configuration.
In basic form, this parameter contains a string of CSS which will be injected into the <ha-card> element of the card.
NOTE: card-mod only works on cards that contain a ha-card element. This includes almost every card which can be seen, but not e.g.
conditional,entity_filter,vertical-stack,horizontal-stack,grid.Note, though that those cards often include other cards, which card-mod can work on.
See the manual for each card to see how to specify parameters for the included card(s).
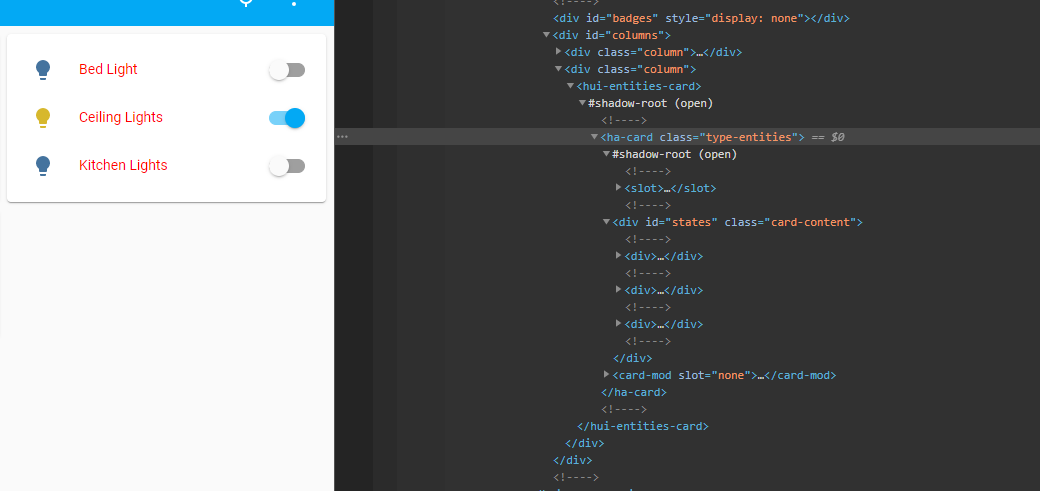
The bottommost element that can be styled is the <ha-card>.
Screenshot of the ha-card element in the Chrome DOM inspector
TIP: Home Assistant themes makes use of CSS variables. Those can both be set and used in card-mod - prepended by two dashes:
card_mod:
  style: |
    ha-card {
      --ha-card-background: teal;
      color: var(--primary-color);
    }
Styling entities, badges and elements
In entities and glance cards, each entity can have options. Those elements can be styled individually by adding a card_mod parameter to the entity configuration.
For those cases, the styles are injected into a shadowRoot, and the bottommost element is thus accessed through :host.
This also applies to view badges and elements in picture-elements cards.
type: entities
entities:
  - entity: light.bed_light
    card_mod:
      style: |
        :host {
          color: red;
          }
  - entity: light.ceiling_lights
    card_mod:
      style: |
        :host {
          color: green;
        }
  - entity: light.kitchen_lights
    card_mod:
      style: |
        :host {
          color: blue;
        }
Changing icons
With card-mod installed, the <ha-icon> element - used e.g. by entities, glance and many more cards - will set it's icon to the value found in the CSS variable --card-mod-icon (if present).
It will also set the icon color to the value found in the CSS variable --card-mod-icon-color if present. This ignores entity state, but will still dim.
- entity: light.bed_light
  card_mod:
    style: |
      :host {
        --card-mod-icon: mdi:bed;
      }
Templates
All styles may contain jinja2 templates that will be processed by the Home Assistant backend.
card-mod also makes the following variables available for templates:
config- The entire configuration of the card, entity or badge - (config.entitymay be of special interest)user- The name of the currently logged in userbrowser- The browser_mod deviceID of the devicehash- Whatever comes after#in the current URL
DOM navigation
Home Assistant makes extensive use of something called shadow DOM. This allows for easy reuse of components (such as ha-card or ha-icon) but causes some problems when trying to apply CSS styles to things.
When exploring the cards in your browsers element inspector you may have come across a line that says something like "#shadow-root (open)" (exactly what it says depends on your browser) and have noticed that elements inside that does not inherit the styles from outside.
In order to style elements inside a shadow-root, you will need to make your style: a dictionary rather than a string.
For each dictionary entry the key will be used to select one or several elements through a modified querySelector() function. The value of the entry will then be injected into those elements.
The process is recursive, so the value may also be a dictionary. A key of "." (a period) will select the current element.
Example:
Let's change the color of all third level titles (### like this) in a markdown card, and also change it's background.
If we look at the card in the element inspector of chrome, it looks like this:

The <ha-card> element is the base, and from there we see that we need to go through one #shadow-root to reach the <h3>. That #shadow-rot is inside an <ha-markdown> element, so our selector will be:
ha-markdown$
which will find the first <ha-markdown> element and then all #shadow-roots inside that.
To add the background to the <ha-card>, we want to apply the styles to the base element directly, which has the key
.
This gives the final style:
card_mod:
  style:
    ha-markdown$: |
      h3 {
        color: purple;
      }
    .: |
      ha-card {
        background: teal;
      }
NOTE: The selector chain of the queue will look for one element at a time separated by spaces or "
$".
For each step, only the first match will be selected.
But for the final selector of the chain all matching elements will be selected.E.g. the following will apply styles to the
#shadow-rootof the first action button in analarm-panelcard:"#armActions mwc-button$": |But the following will apply styles to the
#shadow-rootof all action buttons:"#armActions mwc-button:" $: |
Debugging tips
The DOM navigation can be tricky to get right the first few times, but you'll eventually get the hang of it.
To help you, you can use your browsers Element inspector to see which steps card-mod takes.
- Open up the element inspector and find the base element (e.g.
<ha-card>). This should contain a<card-mod>element whether you specified a style or not. - Make sure the
<card-mod>element is selected. - Open up the browsers console (in chrome you can press Esc to open the console and inspector at the same time).
- Type in
$0._input_stylesand press enter.
This is the style information that step of the chain was given. If this is a string, you're at the end of the chain. If it's an object, you can move on to the next ste. - Type in
$0._styleChildrenand press enter.
This is a set of any<card-mod>elements in the next step of any chain. Clicking "card-mod" in thevalue:of the set items will bring you to that<card-mod>element in the inspector, and you can keep on inspecting the rest of the chain.
Styling cards without an <ha-card> element
Cards that don't have a <ha-element> can still be styled by using the supplied custom:mod-card card.
This is only necessary in very few instances, and likely to bring more problems than it solves.
Most likely your card contains another card, in which case that is the one you should apply the styles to.
Enough warnings.
I know what I'm doing
type: custom:mod-card
card:
  type: vertical-stack # for example
  ...
card_mod:
  style: |
    ha-card {
      ...
    }
The mod-card will create a <ha-card> element - with removed background and border - and put your card inside that.
More examples
All my test cases are available in the test/views directory.
You can a demo in docker by going to the test directory and running:
docker-compose up
Then going to http://localhost:8125 and logging in with username dev and password dev.
Or you could use the vscode devcontainer and run the task "Run hass".
Themes
For instructions on how to develop a card-mod theme, see README-themes.md.
Development
For adding card-mods styling powers to your custom card, see README-developers.md.