
"Always be yourself. Unless you can be a puffin, then always be a puffin."
We at puffins are dedicated to provide beautiful, uniting and sustainable products to individuals, love birds and families. With our mehtod to only produce whats demanded by our customers and delivering longlasting, high quality products we want to counter the biggest problems of the western society. Our products are locally produced in Europe and we only use materials where we know the origin, to guarantee 100% ethical and sustainable products.
This site is the final Milestone Projects that made up the Full Stack Web Development Course at Code Institute. The core requirements focus on bulding a fullstack site with the use of Django, Python, JavaScript, HTML, CSS and a relational database. The final result is hosted on Heroku, while storing static and media files on an S3 Cloudstorage from AWS. The store is connected to Stripe.
To test the site incl. the checkout process please use the test credit card number provided in the Stripe Documentation:
- Number: 4242 4242 4242 4242
- Exp. Date: Anything (e.g. 02/24)
- CVC: Anything (e.g. 007)
Visit the deployed site: puffins
- Puffins
- Table of Content
- UXD Considerations
- Information Architecture
- Features
- Technologies Applied
- Testing
- Deployment
- References, Credits & Acknowledgment
- Fair use disclaimer
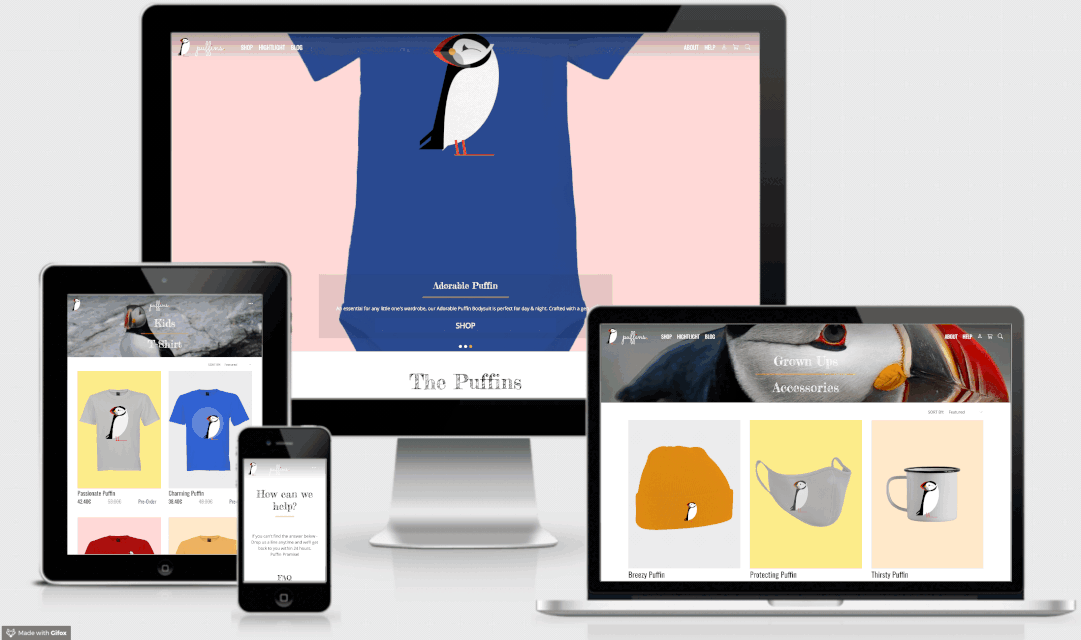
The aim of this project is to create an ecommerce shop for sustainable clothing especially targeted towards young couples and families. The goal is to create this shop as an interactive fullstack website that allows customers to browse products, make purchases by credit card and if registered manage a wishlist or see their orderhistory. These goals should be supported by providing a clean and easy to use website that allows seamless navigation and has a low bounce rate.
Before laying out the project and creating an initial design market research was done. During this research phase the following questions were also acknowledged:
- How do other stores look?
- What are typical design patterns used across stores?
- Which site are appealing to me?
- Which kind of stores fit to my business idea?
The final layout was influenced by the following sites:
The shop is targeted to women and men alike. The typical age of a shopper is estimated to be between 25 and 40 years. Especially couples and small families are targeted with the products. The families usually have 1-2 children in the age of 6 month up to 12 years. All customers have mindset respecting the environment and favoring sustainable products. The income of the target group is an average mid to high household income. Furthermore the target group has a passion for living outdoors and owning sustainable high quality products to use in day to day life.
Before the start of the Project the Epics and User Stories were defined and written out to have complete set of necessary features to get the site going. In total 6 Epics were defined and user stories were broken down into 3 user groups:
- regular site visitors
- registered users
- the store manager/owner.
As a site visitor, i want to...
- ... access the website with any device (smartphone, tablet, desktop), so that i am able to visit the shop anytime and anywhere.
- ... have easy navigation, to quickly solve the reason for my visit.
- ... have information about the brand, to get to know the company and understand their mission and story.
- ... be able to contact the company, so that i quickly can get in touch if i have a question or issue.
As a site visitor, i want to...
- ... browse products by category and productline, so that i quickly find what i am looking for.
- ... sort products, to adjust the order according to my needs.
- ... be able to search for specific products, to quickly get what i need.
- ... to access product details, to get more information on an item.
- ... be able to choose a size, to order the necessary items according to my needs.
As a site visitor, i want to...
- ... see all my items in a cart, so that i have an overview of my potential purchase.
- ... be able to reduce / increase quantity, so that i can order my prefered amount.
- ... be able to remove an item from my cart, so that i can manage my cart efficiently.
- ... be able to checkout from the cart view, so that i can quickly finish my purchase.
- ... be able to pay a order by credit card, so that i don't have to deal with an invoice and money transfer.
- ... receive an order confirmation, so that i know my order was received.
As a registered user, i want to...
- ... have my details prefilled from my profile, so that i quickly can finish my purchase
As a site visitor, i want to...
- ... be able to sign up to the store, so that i can track orders and have my data prefilled in the order form.
As a registered user, i want to...
- ... be able to login, so that i can access my useraccount.
- ... be able to see my order history, so that i know what i've purchased in the past.
- ... manage my personal details, so that i can quickly update my data if something changes.
As a registered user, i want to...
- ... add/remove items to my wishlist, so that can save items for later purchase to my useraccount.
- ... have an overview of my wishlist, to get an overview of my already added products.
As a store owner, i want to...
- ... be able to manage the products, categories, productlines and productvariants, so that i have an overview of my inventory.
- ... manage blog entries, to add new/edit posts on the blog to provide customers some additional value.
- ... manage FAQs, so that i can quickly update often asked questions
The wireframes were created in Figma. Figma is a cloud based desing tool which allows you to rapidly create prototypes, wireframes and layouts Figma
The whole figma project can be accessed here: Puffins - Wireframes
The puffins logo was created by polardots. It shows a vector style puffin stand upright and is signaling joy to the world!
The puffins text logo was created by me with Figma.
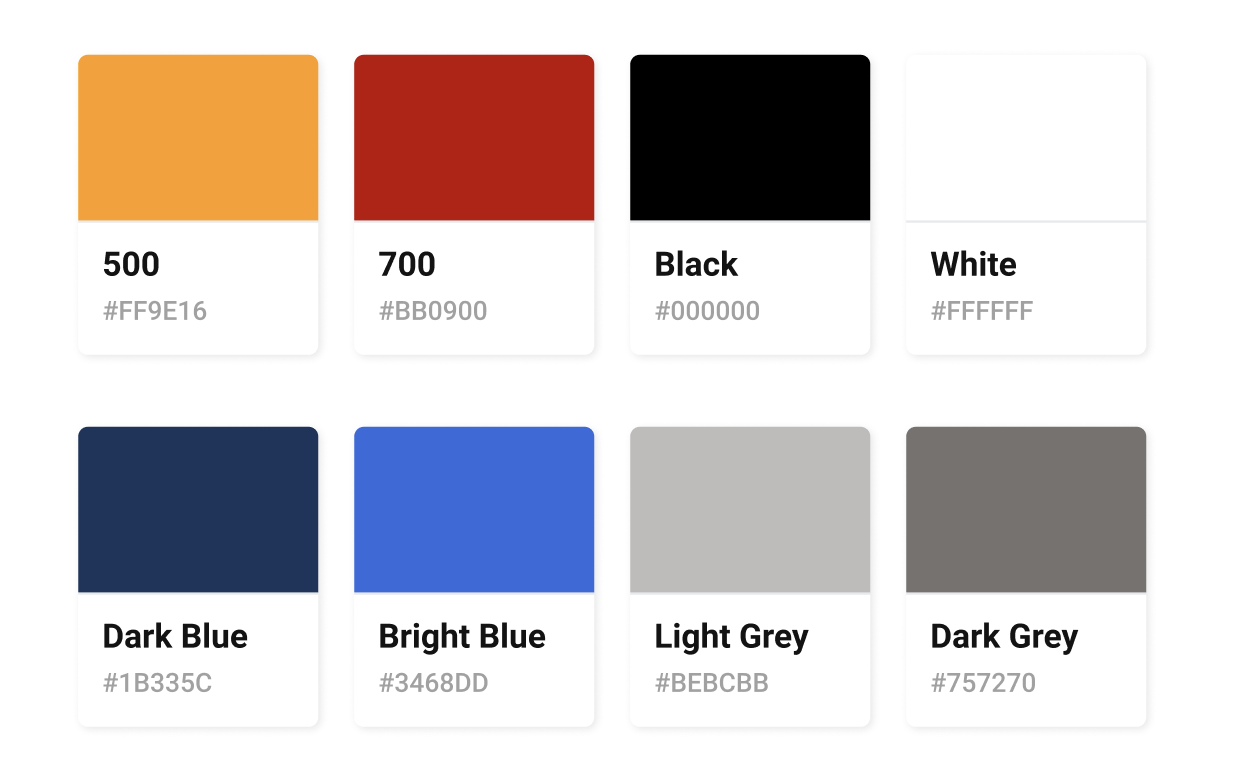
The color scheme was chosen with the goal to represent a lightweight modern website. The colors are taken from the base colors of the puffin bird.
Components were created in Figma:

The whole figma project can be accessed here: Puffins - Wireframes

The project brief required to base the project on the Django application framework - "The web framework for perfectionists with deadlines". Django is an open source python web framework that takes away the burdens of regular web development and allows developers to quickly build a secure, scalable and state-of-the art app.
During development the built-in SQLite3 database from django is used. However, for the deployment to Heroku a switch to postgressql was undertaken. Django’s authentication system in combination with django-allauth is used to manage users and permissions. The structure of the products and checkout app are based on the Boutique Ado project from Code Institute and customized to the specific project needs.
| Name | Type | Example Data |
|---|---|---|
| name | CharField(max_length=254) | grown_ups |
| display_text | CharField(max_length=254) | Grown Ups |
| image | ImageField(null=True, blank=True) | grownup_puffin.png |
| image_url | URLField(max_length=1024, null=True, blank=True) | https://thepuffins.s3.amazonaws.com/media/grownup_puffin.png |
| Name | Type | Example Data |
|---|---|---|
| name | CharField(max_length=50) | tshirt |
| display_text | CharField(max_length=254) | T-Shirt |
| Name | Type | Example Data |
|---|---|---|
| category | ForeignKey( 'Category') | 1 |
| productline | ForeignKey( 'ProductLine') | 1 |
| name | CharField( max_length = 254 ) | passionate |
| display_text | CharField( max_length = 254 ) | Passionate Puffin |
| price | DecimalField(max_digits=6, decimal_places=2, validators=[MinValueValidator(0.01)], blank=True) | 49.95 |
| discount_price | DecimalField(max_digits=6, decimal_places=2, validators=[MinValueValidator(0.01)], blank=True) | 39,96 |
| is_on_sale | BooleanField(default=False) | True |
| avail_for_pre_order | BooleanField( default = False ) | False |
| date_of_dispatch | CharField( max_length = 254 , blank = True , null = True ) | null |
| discontinued | BooleanField( default = False ) | false |
| image | ImageField( null = True , blank = True ) | passionatepuffin.png |
| image_url | URLField( max_length = 1024 , null = True , blank = True ) | https://thepuffins.s3.amazonaws.com/media/passionatepuffin.png |
| description | TextField( null = True , blank = True ) | Made with love and passion: the passionate puffin with its super soft, lightweight cotton fabric and neps in contrast colour has the perfect fit. Wear it on its own or as a base layer under a cardigan. Made the Puffins way, from organic linen from the EU for a great sustainable tee. T-shirts made from linen make you stay cool in the summer . They are more durable and also feel lighter. |
| is_featured | BooleanField( default = False , null = True , blank = True ) | True |
| color | CharField( max_length = 254 , null = True ) | grey |
| material_1 | CharField( max_length = 254 , null = True , blank = True ) | linen |
| material_2 | CharField( max_length = 254 , null = True , blank = True ) | "" |
| Name | Type | Example |
|---|---|---|
| SIZE_CHOICES | [('NO', 'None'), ('XS', 'Extra Small'), ('S', 'Small'), ('M', 'Medium'), ('L', 'Large'), ('XL', 'Extra Large'),] | |
| shirt_size | CharField( max_length = 2 , choices =SIZE_CHOICES) | XS |
| Name | Type | Example |
|---|---|---|
| product | ForeignKey('Product', on_delete=models.CASCADE) | 1 |
| size | ForeignKey('ProductSize', on_delete=models.CASCADE) | XS |
| quantity | IntegerField( validators =[MinValueValidator( 0.0 )]) | 9 |
| Name | Type |
|---|---|
| order_number | CharField( max_length = 32 , null = False , editable = False ) |
| user_profile | ForeignKey(UserAccount, on_delete =models.SET_NULL,null = True , blank = True ,related_name = 'orders' ) |
| order_status | CharField( max_length = 1 , choices =STATUS_OPTIONS, default = '0' ) |
| first_name | CharField( max_length = 50 , null = False , blank = False ) |
| last_name | CharField( max_length = 50 , null = False , blank = False ) |
| EmailField( max_length = 254 , null = False , blank = False ) | |
| phone_number | CharField( max_length = 20 , blank = True ) |
| country | CountryField( blank_label = 'Country' , null = False , blank = False ) |
| zipcode | CharField( max_length = 20 , null = True , blank = False ) |
| town_or_city | CharField( max_length = 40 , null = False , blank = False ) |
| street_address1 | CharField( max_length = 80 , null = False , blank = False ) |
| street_address2 | CharField( max_length = 80 , blank = True ) |
| total_order | DecimalField( max_digits = 10 , decimal_places = 2 , null = False , default = 0 ) |
| total_tax | DecimalField( max_digits = 10 , decimal_places = 2 , null = False , default = 0 ) |
| tax_rate | DecimalField( max_digits = 6 , decimal_places = 2 , null = False , default = 0 ) |
| delivery_cost | DecimalField( max_digits = 10 , decimal_places = 2 , null = False , default = 0 ) |
| grand_total | DecimalField( max_digits = 10 , decimal_places = 2 , null = False , default = 0 ) |
| date_order_placed | DateTimeField( auto_now_add = True ) |
| original_cart | TextField( null = False , blank = False , default = '' ) |
| stripe_pid | CharField( max_length = 254 , null = False , blank = False , default = '' ) |
| Name | Type |
|---|---|
| order | ForeignKey(Order, null = False , blank = False , on_delete =models.CASCADE, related_name = "lineitems" ) |
| productvariant | ForeignKey(ProductVariant, null = False , blank = False , on_delete =models.CASCADE) |
| quantity | IntegerField( blank = False , default = 0 ) |
| lineitem_total | DecimalField( max_digits = 6 , decimal_places = 2 , null = False , default = 0 , editable = False ) |
| Name | Type |
|---|---|
| user | OneToOneField(User, on_delete =models.CASCADE) |
| default_phone_number | CharField( max_length = 20 , null = True , blank = True ) |
| default_street_address1 | CharField( max_length = 80 , null = True , blank = True ) |
| default_street_address2 | CharField( max_length = 80 , null = True , blank = True ) |
| default_zipcode | CharField( max_length = 20 , null = True , blank = True ) |
| default_town_or_city | CharField( max_length = 40 , null = True , blank = True ) |
| default_country | CountryField( blank_label = 'Country' , null = True , blank = True ) |
| Name | Type |
|---|---|
| user_profile | OneToOneField(UserAccount, on_delete =models.CASCADE, null = False , blank = False) |
| wished_products | ManyToManyField(Product, related_name = 'userwishlists' ) |
| Name | Type |
|---|---|
| CATEGORY_CHOICES | [( '1' , 'General' ), ( '2' , 'Return' ), ( '3' , 'Pre Order' ), ( '4' , 'Delivery' ), ( '5' , 'Payment' ),] |
| category | CharField( max_length = 1 , choices =CATEGORY_CHOICES) |
| name | CharField(max_length = 120 , null = True, blank = False ) |
| title | CharField(max_length = 120 , null = True , blank = False ) |
| answer | TextField() |
| created_at | DateTimeField(auto_now_add = True ,null = False ) |
| updated_at | DateTimeField(auto_now = True , null = False) |
| Name | Type |
|---|---|
| author | ForeignKey(UserAccount, on_delete =models.CASCADE, null = False , blank = True ) |
| title | CharField(max_length=120, null=True, blank=False) |
| subtitle | CharField(max_length=180, null=True, blank=False) |
| body | TextField() |
| slug | SlugField(unique=True, max_length=250, default=None) |
| created_at | DateTimeField(auto_now_add=True, null=False) |
| updated_at | DateTimeField(auto_now=True, null=False) |
| title_image | ImageField(null=True, blank=True) |
| title_image_url_1 | URLField(max_length=1024, null=True, blank=True) |
| content_image_1 | ImageField(null=True, blank=True) |
| content_image_url_1 | URLField(max_length=1024, null=True, blank=True) |
| content_image_2 | ImageField(null=True, blank=True) |
| content_image_url_2 | URLField(max_length=1024, null=True, blank=True) |
The following features were thought of.
:white_check_mark =Features that made it into the deployed Project
🧰 = Features that are interessting for Future Development
- Logged in and non-logged in users see different options ✅
- Searchbar opens below nav when search icon is clicked ✅
- Fixed to top and transparent ✅
- Changes background and font color on scroll ✅
- Changes background and font color if collapsed on small screens ✅
- Logo is displayed ✅
- Quicklinks to products are available ✅
- Contact details are accessabile ✅
- Link to About page is present ✅
- Sign Up for Newsletter subscription 🧰
- Caroussel with image also behind nav ✅
- Random featured products are chosen to be displayed in caroussel ✅
- Images for featured icons are different from the product picture to be even more appealing 🧰
- Vision is diplayed ✅
- Short introduction to company is provided ✅
- Images of company founders and founder portrait 🧰
- FAQ are diplayed ✅
- FAQs are categorized ✅
- Contact form available for User ✅
- Chat Option to provide direct support 🧰
- Products can be browsed by Category (e.g. Kids) ✅
- Products can be browsed by Category & Productline (e.g. Kids -> T-Shirt) ✅
- Products can be sorted by...
...Featured Products ✅
...Price ✅ ...Color ✅
...Name ✅ - Products have different labels based on
Normal Product ✅
Sale Product ✅
Pre-Order Productn:white_check_mark: - Product Details have a Select Option if different sizes are available ✅
- Product Details have only a "Add to Cart" button if unisize item ✅
- Partnerlook Section sorts products by name to display matching items side by side ✅
- Product can be shared on social media 🧰
If registered:
- Product Details allow user to add/remove product to/from wishlist ✅
- Products a prominently display ✅
- only featured items are rendered ✅
- Cart is present in Side Drawer Container ✅
- Newest Item is always presented on top ✅
- Total inkl. Tax & Shipping ✅
- Checkout straight from Cart Side Drawer ✅
- Add to cart renders updated cart via Ajax-Request ✅
- Increase/Decrease Quantity request via Ajax within Side Drawer Cart 🧰
- Remove Items from Cart ia Ajax-Request within Side Drawer Cart 🧰
- Reserve requested item & quantity to for 10 Min. to avoid checkouts with unavailable products 🧰
If registered:
- attach cart to userprofile instead of saving to session 🧰
- Order summary ✅
- Form to enter shipping address ✅
- Payment via Credit Card ✅
- Users gets order confirmation by mail ✅
- general discount codes can be used 🧰
- personalized discount codes can be used 🧰
- Users receives order updates when order status changes 🧰
- Apple Pay integration 🧰
If registered:
- Form is prefilled with available user data ✅
- Form data can be saved to userprofile ✅
- Sign up can be undertaken ✅
- Sign up also collected first and last name ✅
- login can be undertaken ✅
- Password reset ✅
- Delete account 🧰
- Sign in with apple or google account 🧰
- User can look up saved address information ✅
- User can update address information ✅
- User can see past orderes ✅
- User can enter detail view of past orders ✅
- User can add/remove items to personal wishlist from product details ✅
- User can view stored wishlist items ✅
- Users can add items to wishlist from product overview 🧰
- users can add items and size to wishlist 🧰
- users can immediatley transform wishlist into order 🧰
- ... can create/read/update/delete products in Django-Admin-View ✅
- ... can create/read/update/delete blogposts in Django-Admin-View ✅
- ... can create/read/update/delete FAQs in Django-Admin-View ✅
- ... can create/read/update/delete Users in Django-Admin-View ✅
- ... Order Management system 🧰
- User can sign up for newsletter 🧰
- User get a coupon code for newsletter subscription 🧰
- User can manage their subscription 🧰
The following technologie were used during the development of the project.
- Google Fonts
- Gitpod
- Figma
- Boto3
- Coverage
- Dj-Database-URL
- Django-Countries
- Django-Heroku
- Django-Storages
- Git
- GitHub
- Gunicorn
- Jigsaw – CSS Validation
- JS Hint
- PEP8
- Pillow
- PIP
- Psycopg2
- Stripe
- W3C – HTML Validation
- MarkdownTOC
A detailed description about the testing process and results can be found in the TESTING.md. To give a brief overlook of the feature testing this table gives a codensed overview of the tested, features, devices, browsers and results:
| Test Case | iPhone Safari | iPhone Chrome | iPhone Edge | iPad Safari | iPad Edge | iPad Brave | Mac Edge | Mac Safari | Mac Chrome |
|---|---|---|---|---|---|---|---|---|---|
| Test Navbar | ✅ | ✅ | ✅ | ✅ | ✅ | ✅ | ✅ | ✅ | ✅ |
| Footer | ✅ | ✅ | ✅ | ✅ | ✅ | ✅ | ✅ | ✅ | ✅ |
| Landing Page | ✅ | ✅ | ✅ | ✅ | ✅ | ✅ | ✅ | ✅ | ✅ |
| About Page | ✅ | ✅ | ✅ | ✅ | ✅ | ✅ | ✅ | ✅ | ✅ |
| Help / Contact Page | ✅ | ✅ | ✅ | ✅ | ✅ | ✅ | ✅ | ✅ | ✅ |
| Shop | ✅ | ✅ | ✅ | ✅ | ✅ | ✅ | ✅ | ✅ | ✅ |
| Highlights | ✅ | ✅ | ✅ | ✅ | ✅ | ✅ | ✅ | ✅ | ✅ |
| Cart | ✅ | ✅ | ✅ | ✅ | ✅ | ✅ | ✅ | ✅ | ✅ |
| Checkout | ✅ | ✅ | ✅ | ✅ | ✅ | ✅ | ✅ | ✅ | ✅ |
| Sign Up | ✅ | ✅ | ✅ | ✅ | ✅ | ✅ | ✅ | ✅ | ✅ |
| Registered Users: Useraccount | ✅ | ✅ | ✅ | ✅ | ✅ | ✅ | ✅ | ✅ | ✅ |
| Registered Users: Wishlist | ✅ | ✅ | ✅ | ✅ | ✅ | ✅ | ✅ | ✅ | ✅ |
This site is deployed to heroku and the versioning was done with git and the Repository is hosted on Github.
This project can be used for development with the following tools:
- IDE of Choie (i prefer Gitpod)
- Python3, PIP & Git should be installed
Furthermore accounts with the following services are used in this project:
Official Github Documentation on cloning a repositiory: Github - Cloning Repos
- Navigate to Mainpage of the repository
- Click on "Code" button
- Choose "Clone with HTTPs" & copy URL
- Open Terminal
- Change the current working directory to prefered location
- Type git clone and past copied URL
git clone https://github.com/p0wen/puffins.git - Press Enter to create local Clone - Make sure your environment supports python3 -
- Type
pip3 install -r requirements.txtinto Terminal - Setup the environment variables. This process is differnet depending on the used IDE. Gitpod supports global Environments for the development process. Therefore they were stored in the settings. The following variables are needed:
DEVELOPMENT=True STRIPE_PUBLIC_KEY = <YOUR STRIPE_PUBLIC_KEY> STRIPE_SECRET_KEY = <YOUR STRIPE_SECRET_KEY> STRIPE_WH_SECRET = <YOUR STRIPE_WH_SECRET> - Migrate the models and create the database by typing the following commands into the terminal:
python3 manage.py makemigrationspython3 manage.py migrate
- Import the provided fixtures in the following order (copy&paste if you like):
python3 manage.py loaddata categoriespython3 manage.py loaddata productlinepython3 manage.py loaddata productspython3 manage.py loaddata proudctsizepython3 manage.py loaddata productvariantspython3 manage.py loaddata blogpython3 manage.py loaddata faq
- Create a superuser for accessing the django admin view with the following command:
python3 manage.py createsuperuserYou will be asked for an email address, username and password. - You should be all set and when using the command
python3 manage.py runserverthe project should run. - You can access the django admin view by adding
~/adminto the end of your (local) URL.
This project is deployed to Heroku. For the deployment the following steps were/are necessary:
- Create/Log in to your Heroku account and create a new App.
- Install Heroku Add-on Heroku Postgres from the Resources tab. The free
Hobby Devversion is fine. Now click the Provision button to add it to your project. - Create requirements.txt from your project with the help of
pip3 freeze --local > requirements.txt(already provided within the repository) - Create a Procfile
echo web: gunicorn puffins.wsgi:application > Procfile(already provided within the repository) - Commit changes to Git
git add .followed bygit commit -m "Deploy: Updated Procfile"(already provided within the repository) - Set the environment variables in Heroku Settings > Reveal Config Variables
The following Variables must be set:
USE_AWS = TRUE AWS_ACCESS_KEY_ID = <YOUR AWS_ACCESS_KEY_ID> AWS_SECRET_ACCESS_KEY = <YOUR AWS_SECRET_ACCESS_KEY> DATABASE_URL = <YOUR DATABASE_URL> (Set by Heroku Postgres) EMAIL_HOST_USER = <YOUR EMAIL_HOST_USER> EMAIL_HOST_PASSWORD = <YOUR EMAIL_HOST_PASSWORD> DEFAULT_FROM_EMAIL = <YOUR DEFAULT_FROM_EMAIL> STRIPE_PUBLIC_KEY = <YOUR STRIPE_PUBLIC_KEY> STRIPE_SECRET_KEY = <YOUR STRIPE_SECRET_KEY> STRIPE_WH_SECRET = <YOUR STRIPE_WH_SECRET> - Extract the DATABASE_URL Value from the Heroku Settings and set it up in your IDE or local .env file. Make sure to keep this DATABASE_URL a secret and definitly don't commit it to Github.
- To test if the Postgres database is connected to your IDE you can make use of the command
python3 manage.py showmigrations. This should show undone migrations for all models. - Now migrate the models and create the postgres database on heroku by typing the following commands into the terminal:
python3 manage.py makemigrationspython3 manage.py migrate
- To setup the data in the database import the provided fixtures in the following order (copy&paste if you like):
python3 manage.py loaddata categoriespython3 manage.py loaddata productlinepython3 manage.py loaddata productspython3 manage.py loaddata proudctsizepython3 manage.py loaddata productvariantspython3 manage.py loaddata blogpython3 manage.py loaddata faq
- Create a superuser for the Postgres database for accessing the django admin view with the following command:
python3 manage.py createsuperuserYou will be asked for an email address, username and password. - Log in to heroku from your terminal
heroku login - Add exisitng repository to Heroku heroku
git:remote -a <your repository> - Push changes to Heroku
git push heroku master - Now go to your S3 account. There bucket should already contain a folder called
static. To upload the product images create a new folder calledmedia. And add the files to this folder. Make sure to grant public read access to these objects. - Finally, visit the app url from heroku and check out your great site!
- Logocreated by Polardots Studio
- Written by me - inspired by TwoThirds
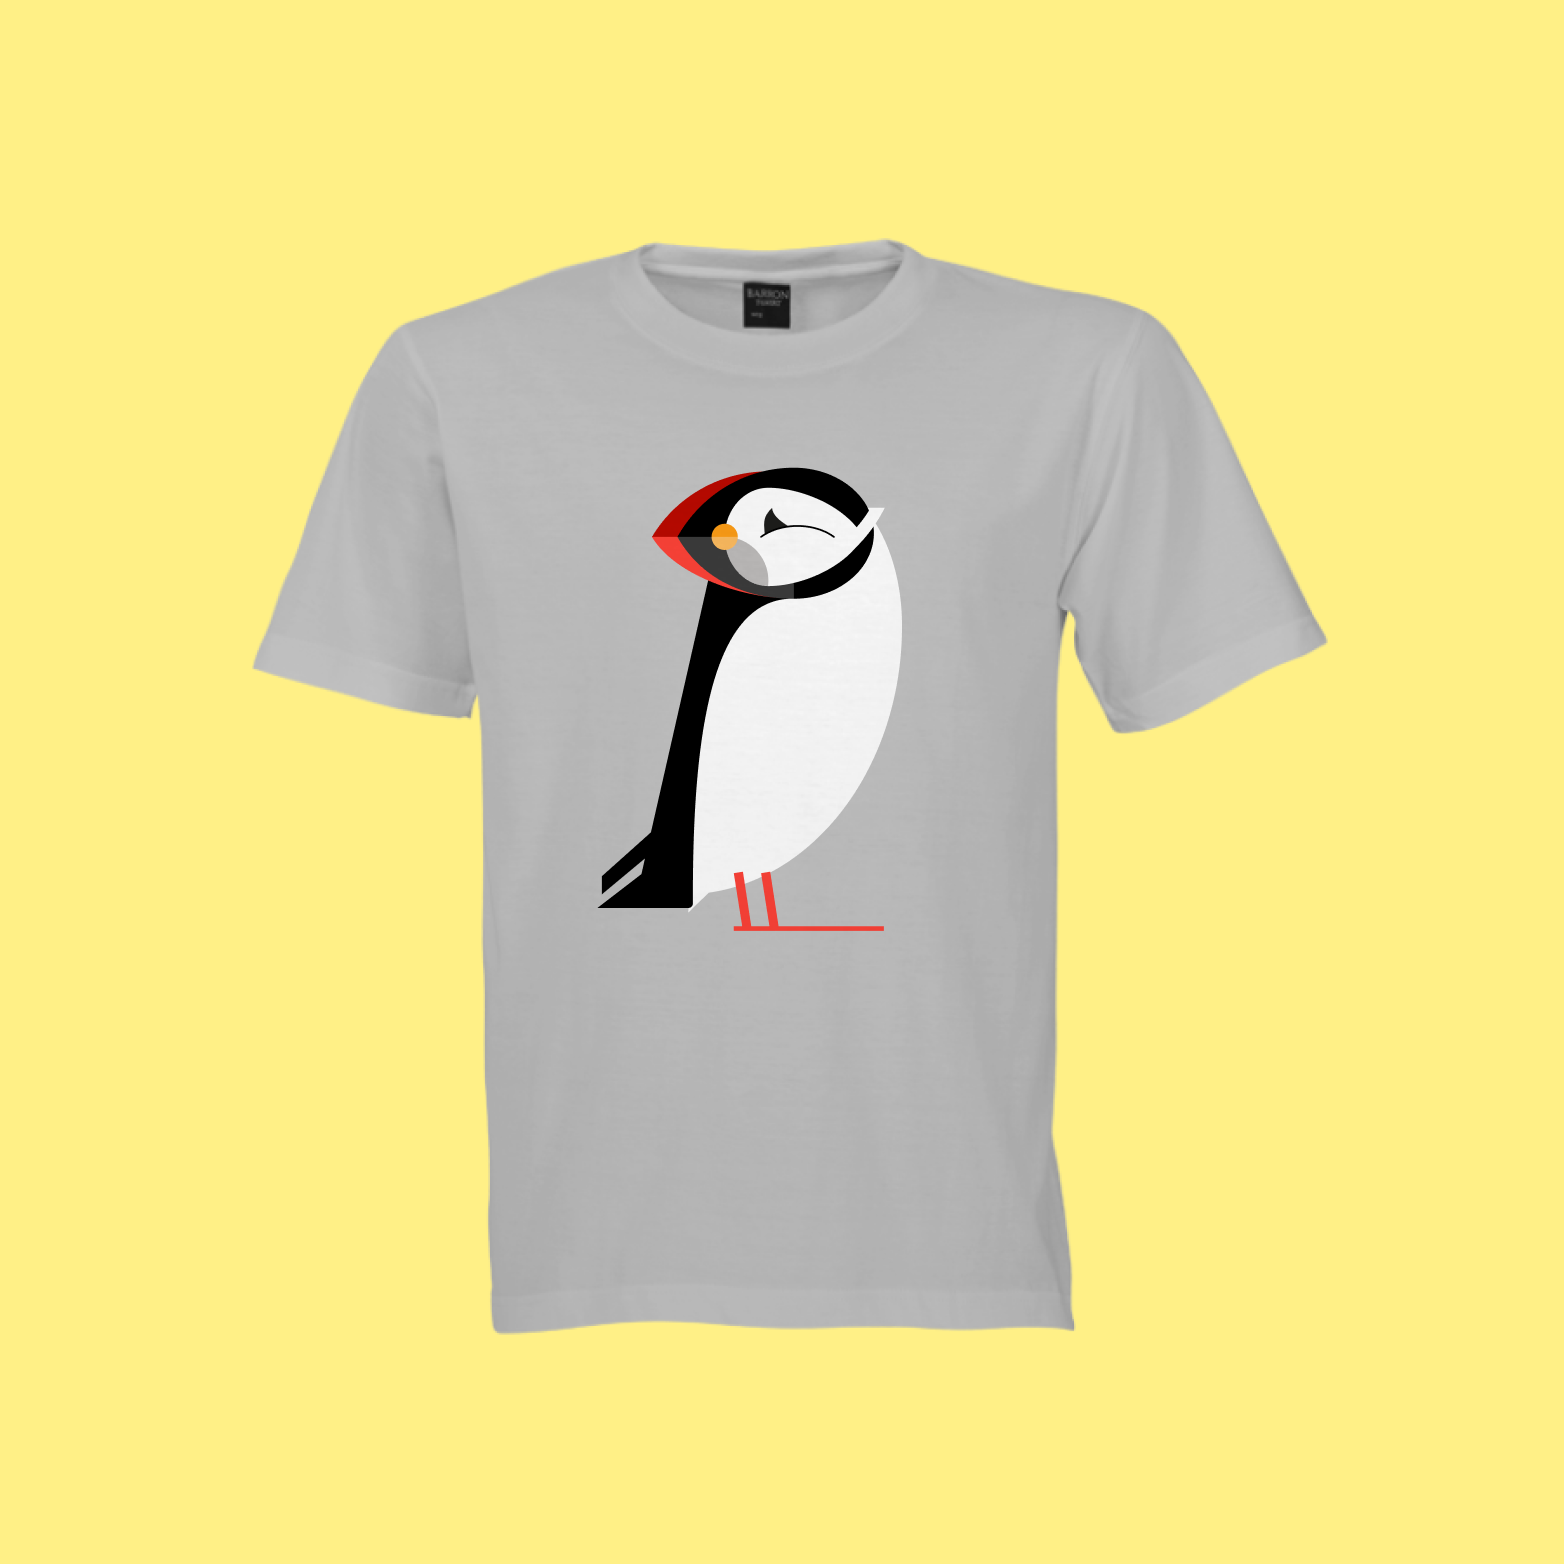
- All Products have been created by myself with Figma
- Tutorial on how to create Tshirts with figma You Tube - Figma T-Shirt Tutorial
Category Images:
Special Thanks to...
- ... Polardots Studio
- ... my Code-Institute Mentor
- ... the Tutor-Crew from Code Institute
- ... PaulF_alumni for his in-depth review and feedback on the finished project
- Project was developed by following the Code Institute Boutique Ado-Poject lessons and was extended and modified to personal needs
- Read up on making drop down full width Stack Overflow - Fullwidth Dropdown Navbar
- Horzizontal line readup Stack Overflow - Horzizontal Line
- Tutorial on how to animate scrollbar Youtube - Animat Scrollbar
- How to custome style navbar Medium - Bootstrap Custom Navbar
- Starting point for carousel Start Bootstrap - Full Slider
- Inspiration for a mega menu W3 Schools - Mega Menu
- Inspiration for product names Magoosh - Positive adjectives
- Bases for toggling colappsed navbar background: Stack Overflow - Navbar Toggle
- How to go back to previous page Stack Overflow - JS Back Button
- How to style crispy forms Simple is Better Than Complex - Crispy Forms
- How to work with ajax and django:
Simple is Better Than Complex - Ajax & Django
Real Python - Django & Ajax form submission - How to avoid duplicates in database of productvariant (product & size) Stack Overflow - Avoid Duplicates
- How to handle names Stack Overflow - Split First / Last Name
- How to control dates in template: Our Code World - How to format date time in view and Template
- Work with many to many fields Rev Sys - ManyToManyField
- How to build your own blog Medium - How to build you own Blog
- Database tables in markdown created with: Tables Generator
- How to create unique slug: SimpleIT Rocks - Automatically slug/
- Assign MEDIA URL for JS Files: Stack Overflow - Django Static Path
This is for educational use
