


![]()
![]()
![]()
![]()

A web-based Shadowsocks management tool.
Features:
- Central user management
- Heartbeat on Shadowsocks ports(users)
- Shadowsocks multi-user API
- Shadowsocks node cluster
- Statistic for network traffic usage
- Scheduled jobs
- dns-lexicon API
- Auto-creating DNS records
- Production deployment ready
- How's the Shadowsocks supported:
- libev edition:
- Full functional.
- python edition:
- Lacks the collection of traffic statistics.
- Lacks the ability to test user port creation status.
- libev edition:
Code in Python, base on Django, Django REST framework, Celery, and SQLite.
The development status can be found at: project home.
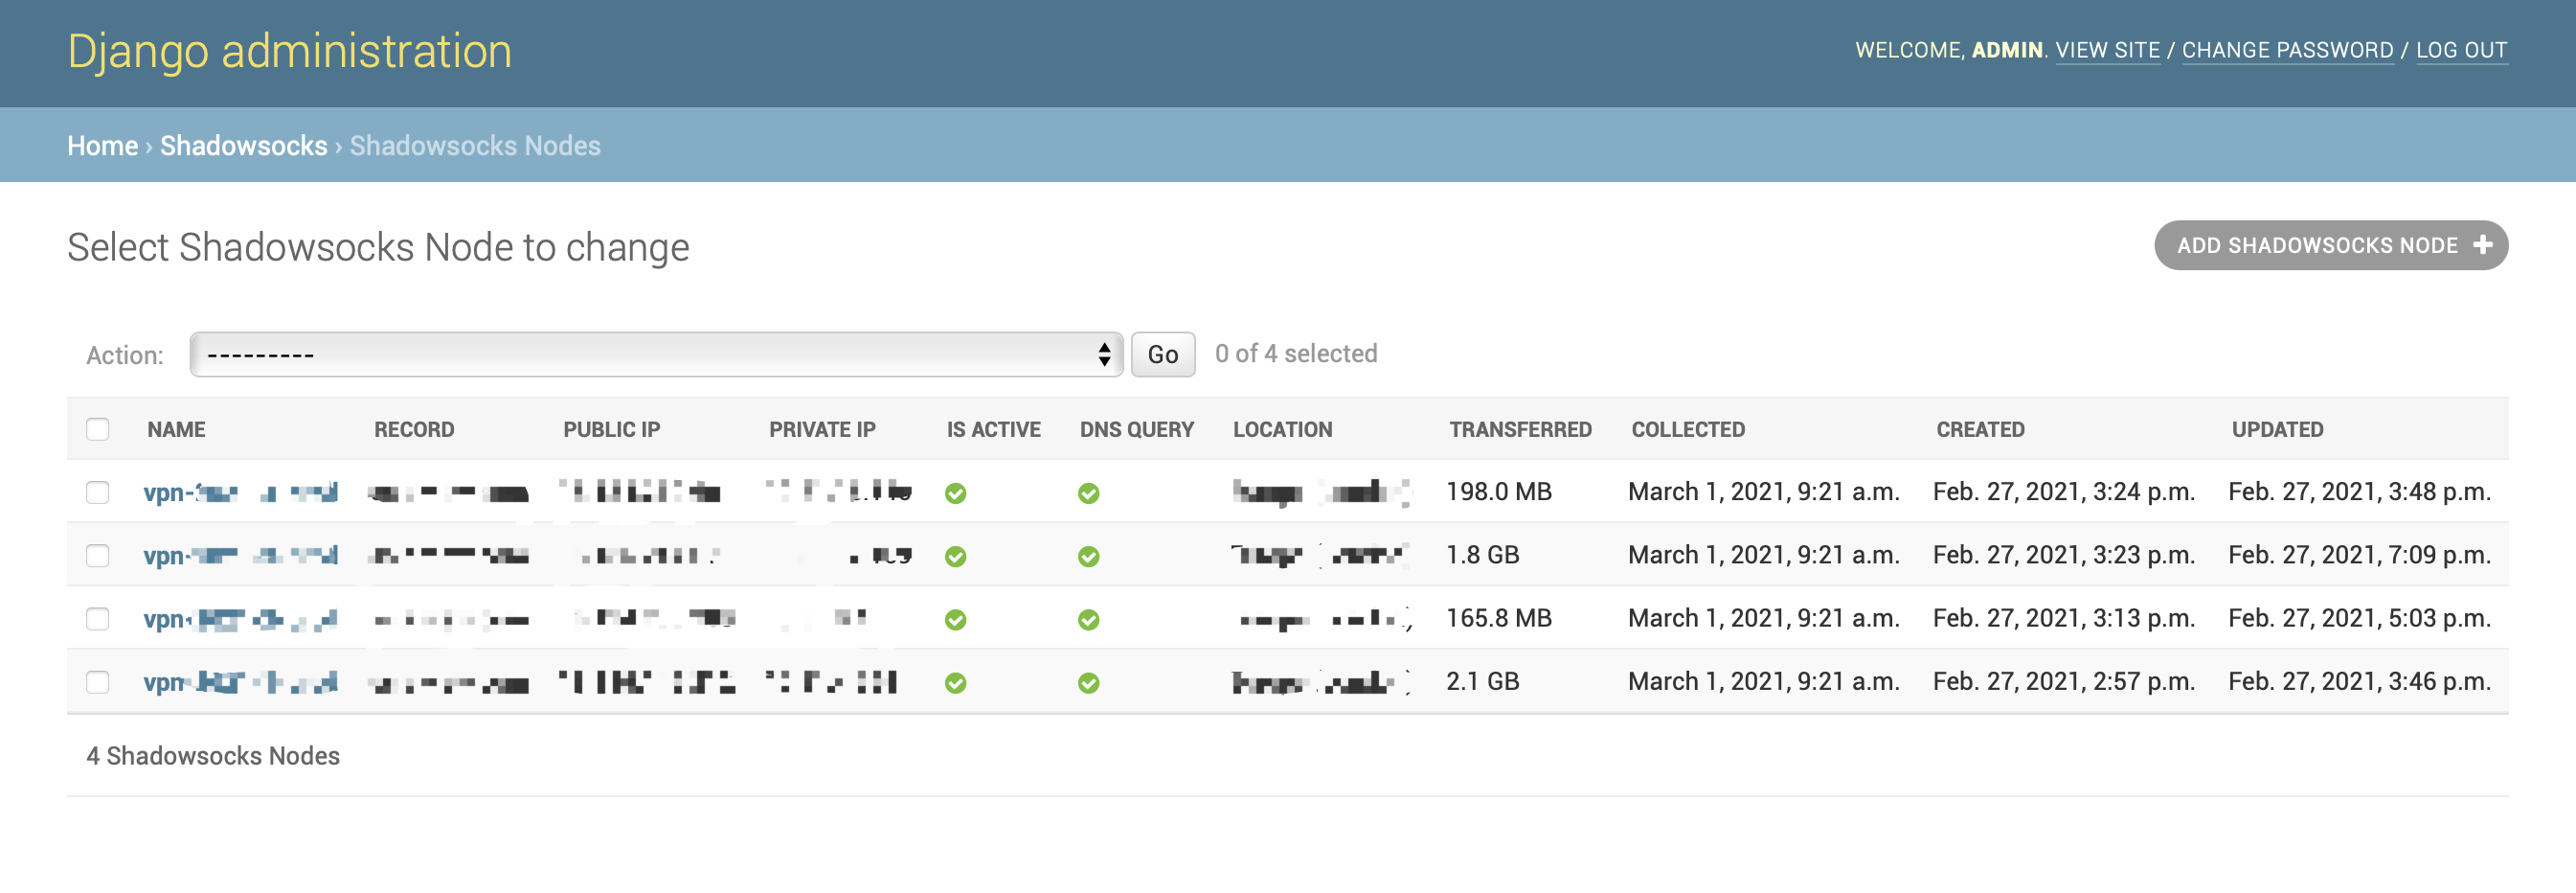
Shadowsocks Node List:
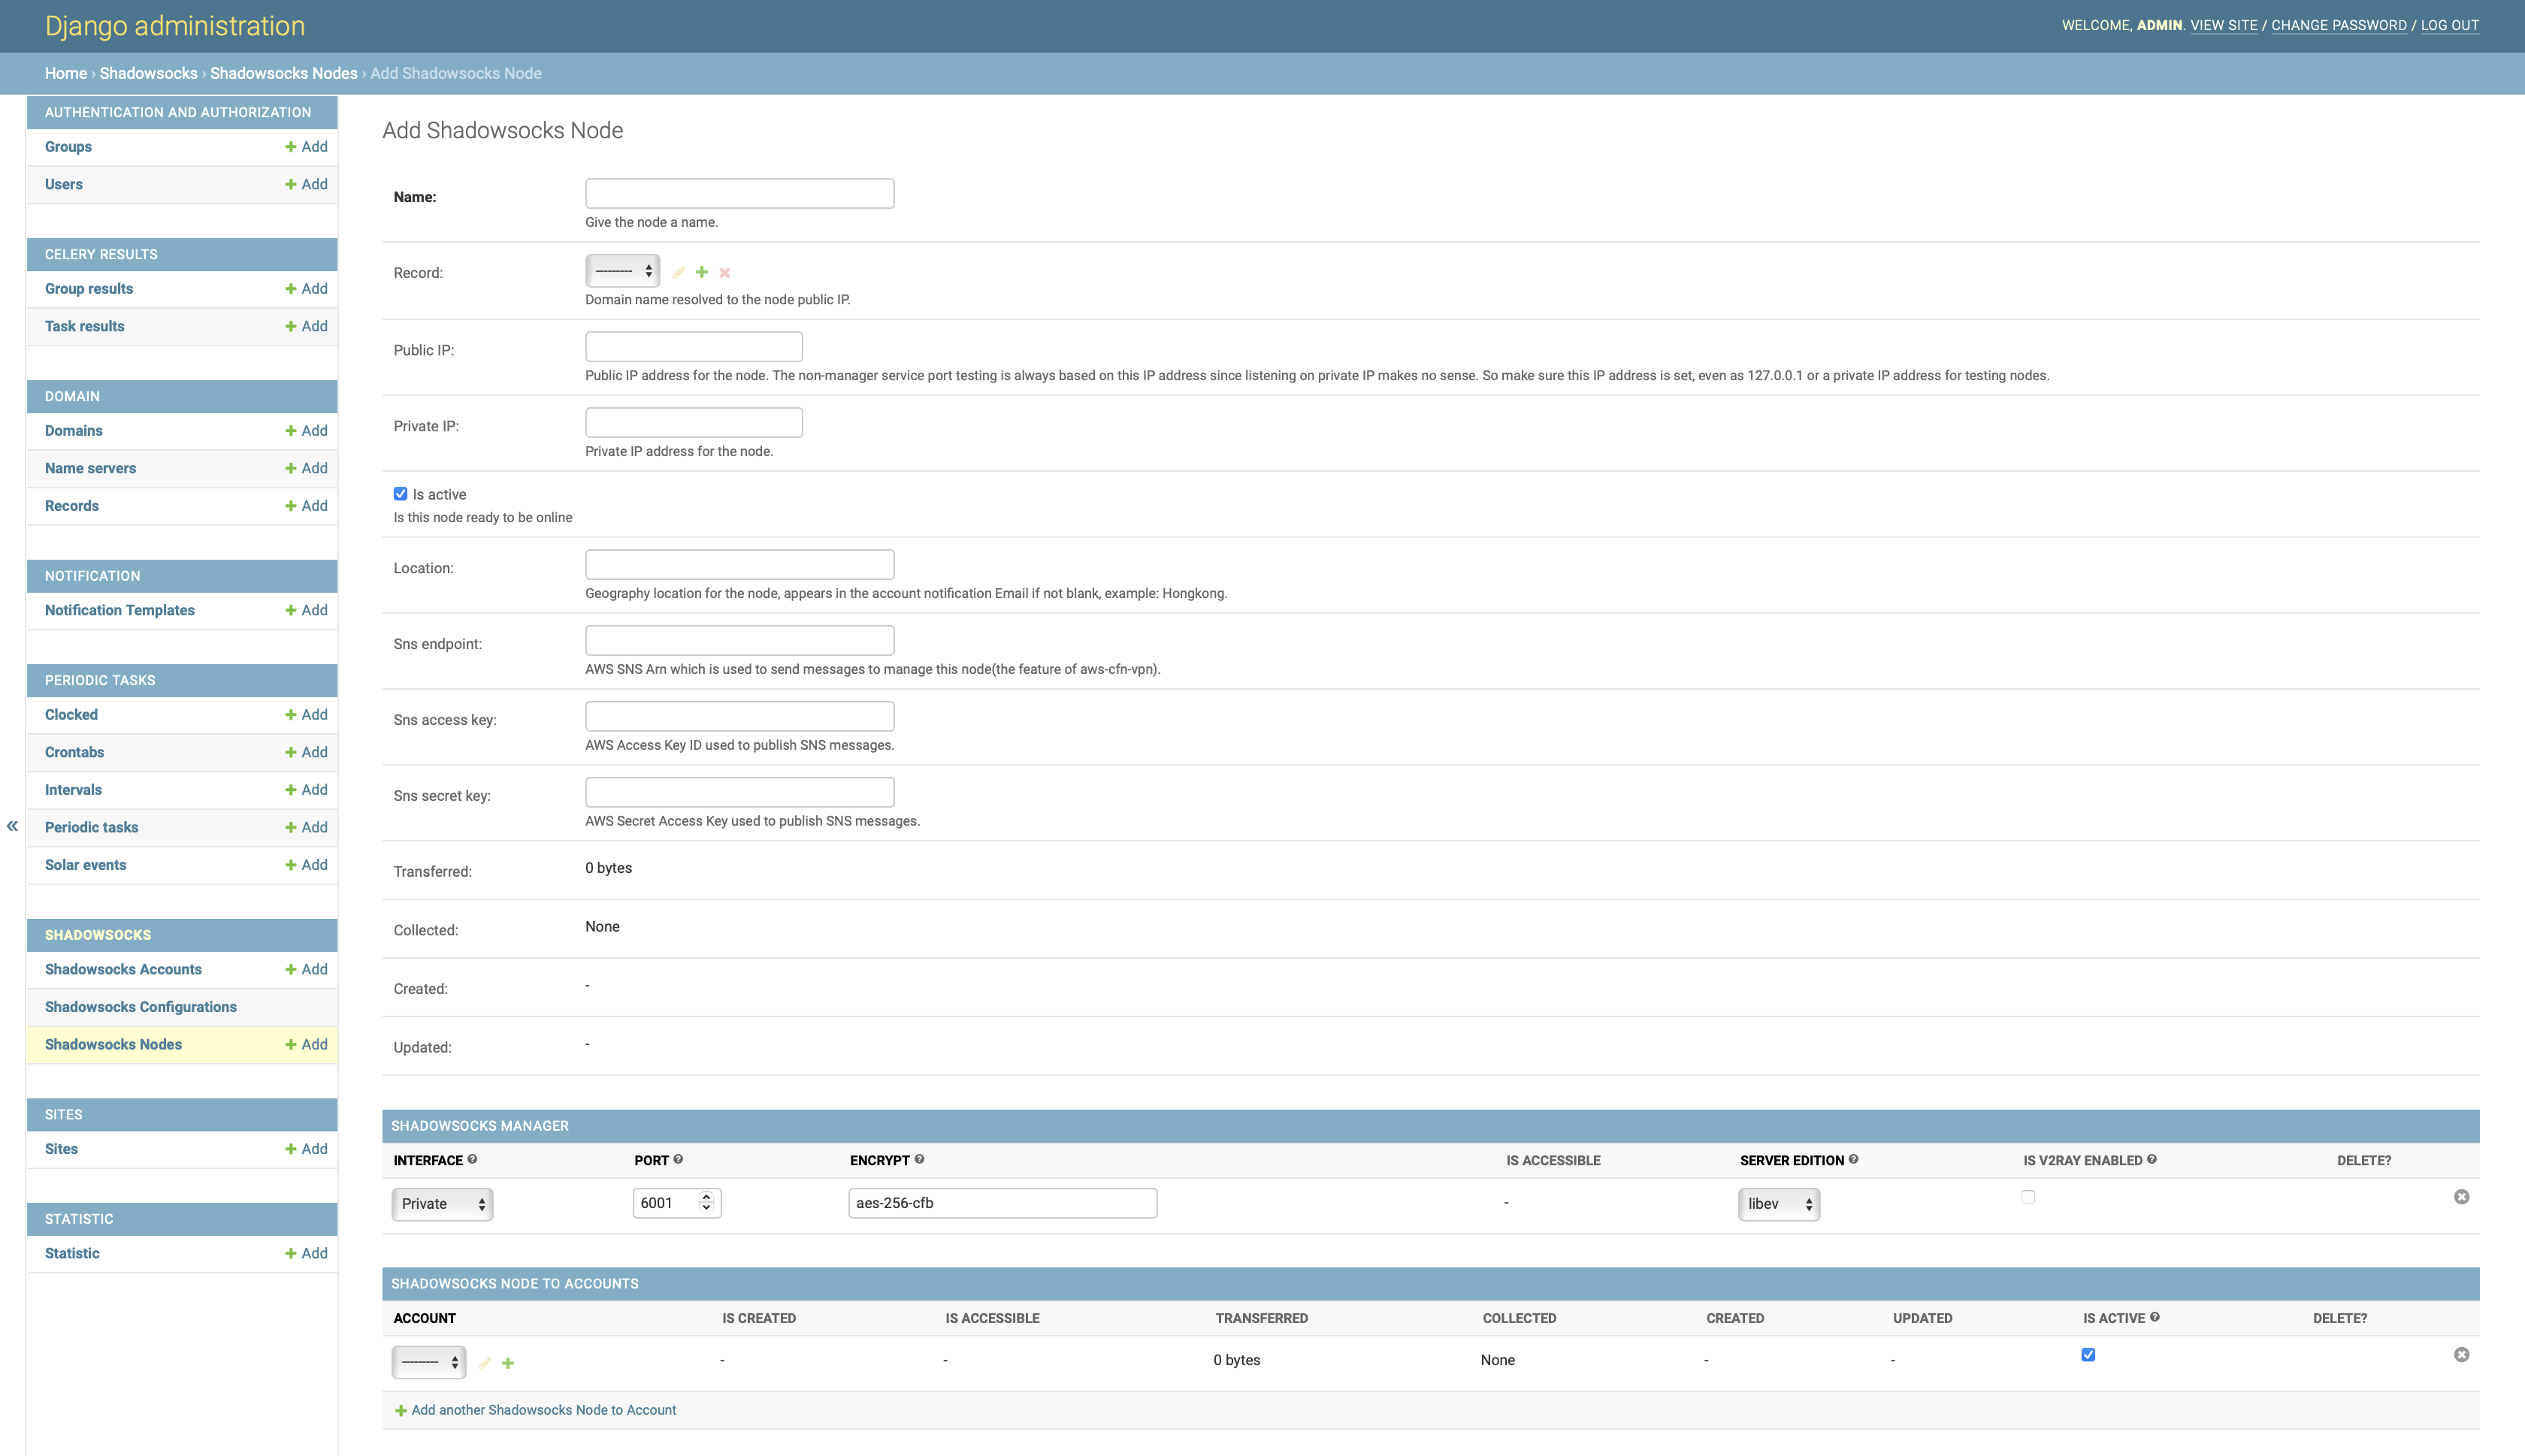
Add Shadowsocks Node:
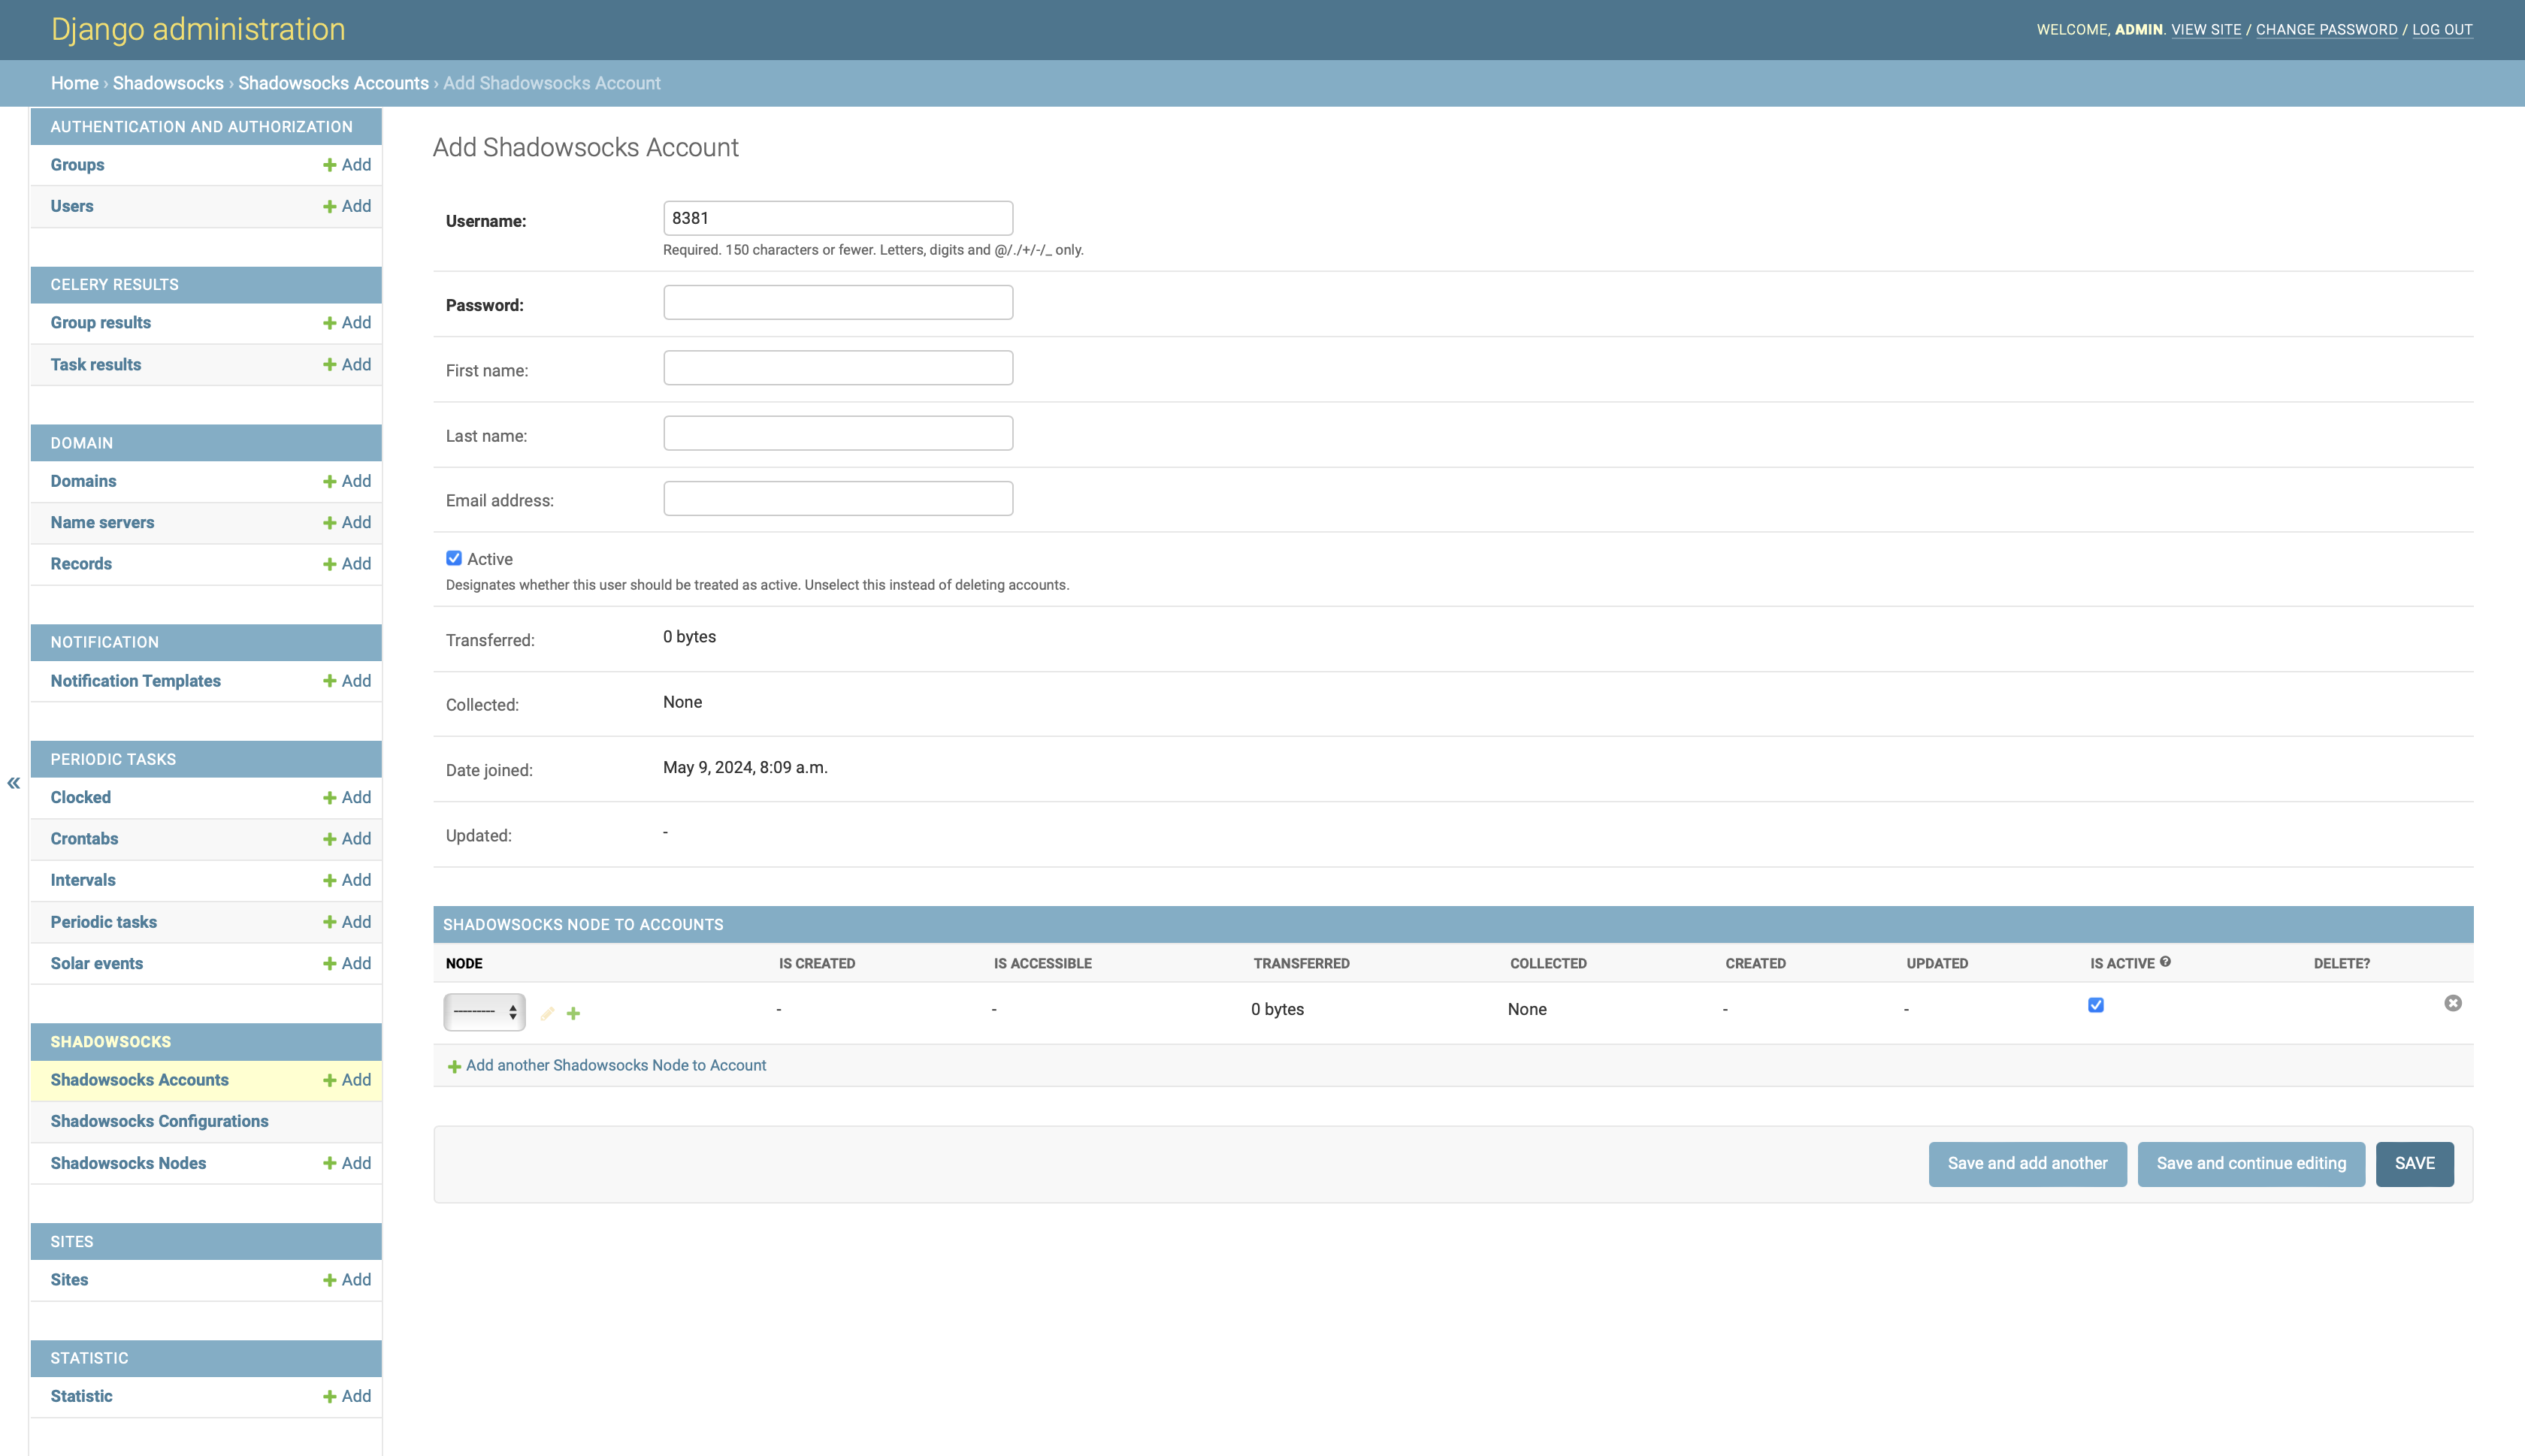
Add Shadowsocks Account:
- Python 2.7, Python 3.x
- Django 1.11.x, Django 3.x
- Docker
- Shadowsocks-libev 3.2.0 for Linux (multi-user API is required)
This project is a part of an entire VPN solution, which includes the Shadowsocks server and Shadowsocks manager. The Shadowsocks server serves the traffic, the Shadowsocks manager serves the users and the traffic statistics. The solution is designed to be deployed in the AWS cloud. If you are looking for such a solution, you can refer to the repo aws-cfn-vpn. With aws-cfn-vpn, you can deploy the entire solution with a few commands.
Assume you have installed the Docker on your host.
# create a docker network
docker network create ssm-network

# run memcached, used by django cache
docker run -d --network ssm-network --name ssm-memcached memcached

# run rabbitmq, used by celery
docker run -d --network ssm-network --name ssm-rabbitmq rabbitmq

# create a directory to store the data, it will be mounted to the shadowsocks-manager container
mkdir -p ~/ssm-volume

# run the shadowsocks-manager with HTTPS and DNS API enabled
# please replace the options with your own settings
docker run -d -p 80:80 -p 443:443 -v ~/ssm-volume:/var/local/ssm \
    --network ssm-network --name ssm alexzhangs/shadowsocks-manager \
    -e SSM_SECRET_KEY=yourkey -e SSM_DEBUG=False \
    -e SSM_MEMCACHED_HOST=ssm-memcached -e SSM_RABBITMQ_HOST=ssm-rabbitmq \
    -u admin -p yourpassword -M [email protected] \
    -d admin.ss.example.com -a 127.0.0.1 -S
-E PROVIDER=namecom,LEXICON_PROVIDER_NAME=namecom,LEXICON_NAMECOM_AUTH_USERNAME=your_username,LEXICON_NAMECOM_AUTH_TOKEN=your_tokengit clone https://github.com/alexzhangs/shadowsocks-manager
bash shadowsocks-manager/install.sh -u admin -p yourpassword -M [email protected] \
-d admin.ss.example.com -a 127.0.0.1 -S \
-E PROVIDER=namecom,LEXICON_PROVIDER_NAME=namecom,LEXICON_NAMECOM_AUTH_USERNAME=your_username,LEXICON_NAMECOM_AUTH_TOKEN=your_tokenIf all go smoothly, the shadowsocks-manager services should have been all started. Open the web admin console in a web browser, and log on with the admin user.
Use (depends on your settings):
https://admin.ss.example.com/admin
or:
https://localhost/admin
or fall back to HTTP:
http://localhost/admin
If goes well, then congratulations! The installation has succeeded.
By default, the following entries are added to Django's ALLOWED_HOSTS setting:
- localhost
- 127.0.0.1
- admin.ss.example.com (whatever provided with
-doption)
Use -e SSM_ALLOWED_SITES_DEFAULTS_PLUS=$ip_address to add the additional IP address (such as the private IP address of your server) to the ALLOWED_HOSTS setting.
Use -e SSM_ALLOWED_SITES_DYNAMIC_PUBLIC_IP=True to allow the dynamic public IP address to be added to the ALLOWED_HOSTS setting.
For more options, refer to the help message of the scripts:
bash shadowsocks-manager/install.sh -h
bash shadowsocks-manager/docker/docker-entrypoint.sh -h
bash shadowsocks-manager/bin/ssm-setup.sh -h-
Shadowsocks server
First, you need to have a Shadowsocks server with the multi-user API enabled.
Install it with docker on the same docker network with shadowsocks-manager.
# run shadowsocks-libev
MGR_PORT=6001
SS_PORTS=8381-8385
ENCRYPT=aes-256-gcm
docker run -d -p $SS_PORTS:$SS_PORTS/UDP -p $SS_PORTS:$SS_PORTS \
    --network ssm-network --name ssm-ss-libev shadowsocks/shadowsocks-libev:edge \
    ss-manager --manager-address 0.0.0.0:$MGR_PORT \
    --executable /usr/local/bin/ss-server -m $ENCRYPT -s 0.0.0.0 -u

# Use below command to get the private IP address of the shadowsocks-libev container for later configuration.
docker inspect ssm-ss-libev | grep IPAddress
-
Add Shadowsocks server to shadowsocks-manager
Add the Shadowsocks server as a Node of shadowsocks-manager from web admin console:
Home › Shadowsocks › Shadowsocks Nodes.For the field
Private IP, use the IP address abtained from the previous step. For the fieldInterfacefor the Shadowsocks manager, choosePrivate. -
Create users(ports) and assign Shadowsocks Node
Create users from web admin console:
Home › Shadowsocks › Shadowsocks Accountsand assign the existing nodes to them.After a few seconds, the created user ports should be available to your Shadowsocks client.
sendmail is used to send account notification Email, it should
be configured on the same server with shadowsocks-manager.
About how to configure sendmail client to use AWS SES as SMTP server on AWS EC2 instance, refer to repo
aws-ec2-ses.
On macOS, refer to repo macos-aws-ses.
NOTE: This dependency needs the manual setup anyway, it is not handled by any installation script.
5. Differences from the alternation: shadowsocks/shadowsocks-manager
This repo Do's:
- Serve as a nonprofit business model.
- Have central user management for multi nodes.
- Collect traffic statistic that can be viewed by account, node, and period.
- Show the existence and accessibility of ports in the admin.
- Handle the DNS records if using Name.com as nameserver.
This repo Don'ts:
- Handle self-serviced user registration.
- Handle bill or payment.
- Need to run an additional agent on each Shadowsocks server.
Version status for the Shadowsocks Python edition:
Although the Shadowsocks Python edition supports the multi-user API, but it doesn't fit this project, here's why:
- The python edition code and doc seem to be out of maintenance due to some reason. If you really need this you probably need to fork it and make your own.
- They are having different service process names and CLI interfaces which introduces the complexity of installation.
- The Python edition lacks the
listcommands. A pull request was opened years ago but never merged. - The Python edition's
statcommand has a very different way to use, I didn't figure the usage syntax out by looking into the code. - The Python edition's
pingcommand returns a simple stringpongrather than a list of ports. - The Python edition's
pingcommand has to be sent as the syntax:ping:{}in order to work if tested withnc. It caused by the tailing newline:ping\n.
So either you get some change on your own or stick with the libev edition.
-
The Shadowsocks Python edition's ssserver won't start on macOS. The error message is like:
$ ssserver -k passw0rd
WARNING: /Users/***/.pyenv/versions/3.12.0/envs/ssm-3.12/bin/python3.12 is loading libcrypto in an unsafe way
Abort trap: 6
Solution: Link the homebrew openssl library to the system library.
sudo ln -s /opt/homebrew/opt/openssl/lib/libcrypto.dylib /usr/local/lib/
sudo ln -s /opt/homebrew/opt/openssl/lib/libssl.dylib /usr/local/lib/
-
Install the project by source with pip under Python 2.7 get error:
python --version
Python 2.7.18

pip install .
Error message:
...
Collecting pyyaml
Downloading PyYAML-5.4.1.tar.gz (175 kB)
    |████████████████████████████████| 175 kB 392 kB/s
Installing build dependencies ... done
Getting requirements to build wheel ... error
ERROR: Command errored out with exit status 1:
...
    raise AttributeError, attr
AttributeError: cython_sources
...
Solution:
pip install setuptools wheel pip install --no-build-isolation . -
Install the project with pip under python 2.7 get error:
python --version
Python 2.7.18

pip install .
Error message:
...
Building wheels for collected packages: cryptography
    Building wheel for cryptography (PEP 517) ... error
    ERROR: Command errored out with exit status 1:

    build/temp.macosx-14.2-arm64-2.7/_openssl.c:18674:10: error: call to undeclared function 'ERR_GET_FUNC'; ISO C99 and later do not support implicit function declarations [-Wimplicit-function-declaration]
        return ERR_GET_FUNC(x0);
        ^
    build/temp.macosx-14.2-arm64-2.7/_openssl.c:18690:14: error: call to undeclared function 'ERR_GET_FUNC'; ISO C99 and later do not support implicit function declarations [-Wimplicit-function-declaration]
        { result = ERR_GET_FUNC(x0); }
                ^
    build/temp.macosx-14.2-arm64-2.7/_openssl.c:23389:10: error: call to undeclared function 'FIPS_mode'; ISO C99 and later do not support implicit function declarations [-Wimplicit-function-declaration]
        return FIPS_mode();
            ^
    build/temp.macosx-14.2-arm64-2.7/_openssl.c:23400:14: error: call to undeclared function 'FIPS_mode'; ISO C99 and later do not support implicit function declarations [-Wimplicit-function-declaration]
        { result = FIPS_mode(); }
                ^
    build/temp.macosx-14.2-arm64-2.7/_openssl.c:23415:10: error: call to undeclared function 'FIPS_mode_set'; ISO C99 and later do not support implicit function declarations [-Wimplicit-function-declaration]
        return FIPS_mode_set(x0);
        ^
    build/temp.macosx-14.2-arm64-2.7/_openssl.c:23431:14: error: call to undeclared function 'FIPS_mode_set'; ISO C99 and later do not support implicit function declarations [-Wimplicit-function-declaration]
        { result = FIPS_mode_set(x0); }
...
ERROR: Failed building wheel for cryptography
Solution:
brew install [email protected]
-
Domain record is not synced into DNS provider as expected.
There might be a conflict record in the DNS provider. For example, a record with the same name but different type, such as CNAME. The sync process will be limited to the records with same type and name, it won't touched any other records.
Solution:
- Remove the conflict record from the DNS provider by yourself.
- Run the sync process again.
The development of this project requires Python 3.x.
However, the installation of the project is compatible with both Python 2.7 and 3.x. To keep the compatibility is difficult, but it's kept due to the historical reason. The following files are kept only for installing the source distribution of the PyPI package under Python 2.7:
- setup.py
- setup.cfg
- Install Docker Desktop
-
Install pyenv (macOS)
brew install pyenv pyenv-virtualenv
-
Bootstrap the tox environment
pyenv install 3.12
pyenv virtualenv 3.12 tox
pyenv activate tox
pip install -r tox.txt
export VIRTUALENV_DISCOVERY=pyenv
tox list -q
To test the project with Python 2.7, need:
pyenv virtualenv 3.12 tox-27 pyenv activate tox-27 pip install -r tox-27.txt export VIRTUALENV_DISCOVERY=pyenv tox list -q -
Install the Python versions that the project should test against
pyenv install 2.7 3.7 3.8 3.9 3.10 3.11
-
Clone the project code
git clone https://github.com/alexzhangs/shadowsocks-manager cd shadowsocks-manager -
Start the development environment
tox run -qe dev
-
Run the unit tests against all the supported Python versions
tox run -qe py37,py38,py39,py310,py311,py312
-
Combine the coverage data and generate the report
tox run -qe cov
-
Upload the coverage report to codecov
Make sure the
CODECOV_TOKENis exported in the environment before uploading.export CODECOV_TOKEN=codecov_token tox run -qe codecov -
Build the PyPI package
# build source and binary distribution, equivalent to `python setup.py sdist bdist_wheel`
# universal wheel is enabled in the pyproject.toml to make the wheel compatible with both Python 2 and 3
tox run -qe pypi
-
Run the Github workflows ci-unittest locally
brew install act gh
act --list

export GITHUB_PAT_PUB_RO=github_pat
export CODECOV_TOKEN=codecov_token
export PRIVATE_IP=$(ipconfig getifaddr en0 2>/dev/null || hostname -i | cut -d " " -f1 2>/dev/null)

tox run -qe act-ci-unittest

# multiple Python versions
tox run -qe act-ci-unittest -- --matrix python-version:3.7 --matrix python-version:3.8
-
Build the Docker images and run the containers
# optional environment variables:
export DOCKER_BUILD_ARGS_PROXY='--build-arg https_proxy=http://host.docker.internal:1086'
export SSM_DEV_BAR_OPTIONS='-p -P'
export SSM_DEV_DOCKER_RUN_CMD_OPTIONS='-d admin.ss.example.com -t A -a 127.0.0.1 -S -E PROVIDER=namecom,LEXICON_PROVIDER_NAME=namecom,LEXICON_NAMECOM_AUTH_USERNAME=your_username,LEXICON_NAMECOM_AUTH_TOKEN=your_token'

tox run -qe bar
-
Run a full test locally, including all the above steps:
Make sure all the environment variables are set before running the full test.
tox run -q
-
Upload the PyPI package
Set the ~/.pypirc file with the API token from the TestPyPI and PyPI before uploading.
pip install twine

# upload the package to TestPyPI
python -m twine upload --repository testpypi dist/*

# upload the package to PyPI
python -m twine upload dist/*
-
Test the PyPI package
# install the package from TestPyPI
# --no-deps is used to skip installing dependencies for the TestPyPI environment
pip install -i https://test.pypi.org/simple/ --no-deps shadowsocks-manager

# install the package from PyPI
# --no-binary is used to force building the package from the source
# --use-pep517 is used together to make sure the PEP 517 is tested
pip install --no-binary shadowsocks-manager --use-pep517 shadowsocks-manager
Github Actions is currently used for the CI/CD. Travis CI is removed due to the limitation of the free plan.
The CI/CD workflows are defined in the .github/workflows directory.
- ci-unittest.yml: Run the unit tests.
- ci-testpypi.yml: Build and upload the package to TestPyPI.
- ci-pypi.yml: Build and upload the package to PyPI. It can be triggered by the tag:
ci-pypiorci-pypi-(major|minor|patch|suffx). - ci-docker.yml: Build and push the docker image to Docker Hub. It can be triggered by the Github release.
-
Docker
# containers docker ps -a # network docker network ls # logs docker logs <container_id> -
Check the logs (inside container)
# supervisor (debian) cat /var/log/supervisor/supervisord.log # supervisor (alpine) cat /var/log/supervisord.log # uWSGI cat /var/log/ssm-uwsgi.log # Celery cat /var/log/ssm-cerlery* -
Check the services (inside container)
# nginx nginx -s {stop|quit|reopen|reload} # supervisor supervisorctl reload supervisorctl start all # uWSGI supervisorctl start ssm-uwsgi # Celery supervisorctl start ssm-celery-worker supervisorctl start ssm-celery-beat # acme.sh acme.sh --list crontab -l ls -l /root/.acme.sh # volume data ls -la /var/local/ssm # setup done files ls -la /var/local/ssm/.*done ls -la /root/.*done -
Check the listening ports and processes (Linux)
# TCP netstat -tanp # UDP netstat -uanp -
Check the listening ports (MacOS)
# TCP
netstat -anp tcp

# UDP
netstat -anp udp

# find the process by port
lsof -i :80 -P
-
Never run the shadowsocks-manager service with the Django 'DEBUG' mode enabled in production or even for evaluation. Especially when the default password is used, the debug mode will expose your env in the error page. This option should be enabled only for the development on the local machine.
- The 'DEBUG' mode is disabled by default in the docker image.
- The 'DEBUG' mode is enabled by default in the pypi package, it should be disabled if not for development.
-
Never run the shadowsocks-manager service with the default password on the network other than the localhost.
-
Never run the shadowsocks-manager service without HTTPS enabled on the network other than the localhost. Otherwise, the password will be sent in plain text over public or private networks.
-
Never run the shadowsocks-manager service and the ss-manager service across the untrusted network without the firewall enabled, such as Internet, untrusted private network, etc.
The ss-manager service does not support authentication. Anyone who can access the service port can control the Shadowsocks server, including creating, deleting, and listing user ports and passwords.
To secure the ss-manager service, you can consider the following methods:
- Use VPC, VPN, or a private network to isolate the ss-manager service from the public network.
- Use VPC peering connection or DC gateway to connect the shadowsocks-manager service and the ss-manager service if they are in different VPCs.
- Ensure that the network traffic between the shadowsocks-manager service and the ss-manager service cannot be sniffed by untrusted parties.
- Use firewall rules to limit access to the ss-manager service port only from the shadowsocks-manager service.
Please note that the running infrastructure and deploying architecture may vary, so it's important to pay extra attention to this issue.

![dependabot[bot] avatar](https://avatars.githubusercontent.com/in/29110?v=4 "dependabot[bot]")


