
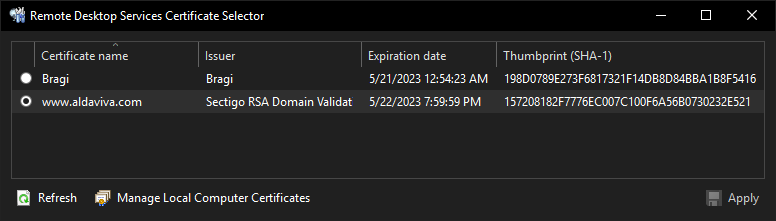
This GUI program lets you choose the certificate to encrypt your Remote Desktop Services connections.
In Windows Server 2008 R2 and earlier, this functionality was available in the Remote Desktop Session Host Configuration (tsconfig.msc). However, Microsoft deleted this file from Windows Server 2012 and later, which means you can only configure it programmatically using WMI. This program restores the graphical certificate choice functionality that was removed.
Thanks to major web browser vendors needlessly bullying certificate authorities into restricting the maximum validity period of certificates to roughly 1 year, I now have to deal with this problem far more often than if I could just buy a 5-year cert, install it once, and then not think about it for a long time. This change makes no sense: my owner checks are simply using domain validation, which is just a simple proof of DNS control and does not guarantee much of anything; key rotation is not more frequent because you are not required to generate a new private key or certificate signing request, just a public cert; and all of the improvements over time in public key cryptography come from the protocols which use the certificates, not the certs themselves, such as Apache httpd and Nginx implementing HTTP/2, TLS 1.3, and improved cipher suites.
- Windows
- Tested on Server 2019
- Should work on any other versions too
- .NET Framework 4.8
- Download the latest EXE file from Releases.
This is a portable application. You can save it, run it, and then delete it when you're done. It won't leave any files or registry values behind.
Both your public certificate and private key are required for servers like Remote Desktop Services. These must be imported into a Windows certificate store using PKCS #12 format, which uses the P12 and PFX file extensions. If you don't convert to PKCS #12, the private key can't be imported, and you won't be able to encrypt traffic on your server.
If you have a certificate that you want to import, like a pair of PEM or DER files, you will first need to temporarily convert it to PKCS #12 using OpenSSL.
openssl pkcs12 -in "mypubliccert.pem.crt" -inkey "myprivatekey.pem.key" -out "mycertandkey.pfx" -exportWarning
This PFX file, not the CRT file, is the correct file to import into the Windows certificate store, because it includes the private key. Be aware that the Certificate Import Wizard defaults to only showing CER and CRT files, so it's easy to accidentally import without the private key and therefore be unable to use it with your server. Be sure to change the file type dropdown in the Open dialog box from "X.509 Certificate" to "Personal Information Exchange" so that your PFX file is shown.
After importing the PFX file, you can delete it from disk.
- Run
RemoteDesktopServicesCertificateSelector.exe. - If you haven't already done so, install your new certificate into Certificates (Local Computer) › Personal › Certificates.
- You can open this certificate store by clicking
Manage Local Computer Certificates.
- Import the certificate using Action › All Tasks › Import…
- On the Certificate Store page of the Certificate Import Wizard, ensure the Certificate Store choice set to Place all certificates in the following store: Personal.
- Once it's installed, click
 Refresh in this program to show the newly-installed certificate.
- You can open this certificate store by clicking
- Click the radio button for the certificate you want to use on your RDP connections.
- Click
Apply.
New RDP connections to your server will now use the new certificate. This change takes effect immediately for all new connections — you don't need to restart any services or your computer. Existing RDP sessions will continue to use the old certificate until you disconnect.
You can view a certificate or copy its SHA-1 thumbprint by right-clicking on a row.
To test the new certificate, you can reconnect using mstsc.exe. Next, click the 🔒 Security Information button in the fullscreen toolbar, then click View Certificate.
- If the Remote Desktop Connection is not in fullscreen, you can change Options › Display › Full Screen before connecting, or right-click the title bar and choose Full Screen after connecting.
- If the 🔒 button doesn't appear in the blue toolbar at the top of the screen when Remote Desktop Connection is in fullscreen, then the connection is using a self-signed certificate.
You can also test the certificate with OpenSSL.
openssl s_client -connect myserver.com:3389 | openssl x509 -noout -text


