This is an Arduino library for interacting with Comingle open-source sex toys.
Head to the latest release page and download the source in zip format.
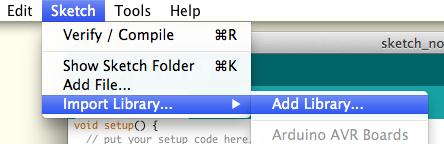
Open the Arduino software, and select the "Sketch" menu, then "Import Library...", and finally "Add Library...". Choose the OSSex zip file that you just downloaded. More information is available at the Arduino Libraries page.
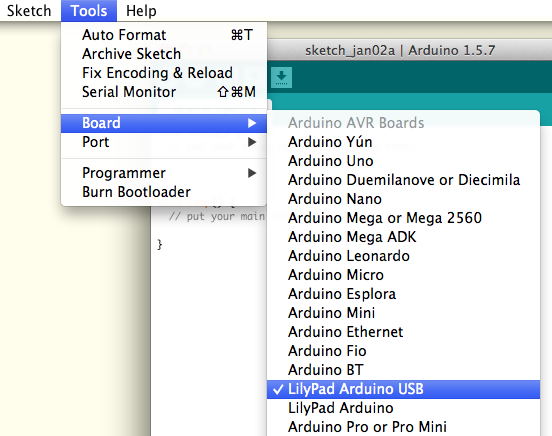
In the Arduino application, make sure to set your board type as a "Lilypad Arduino USB":
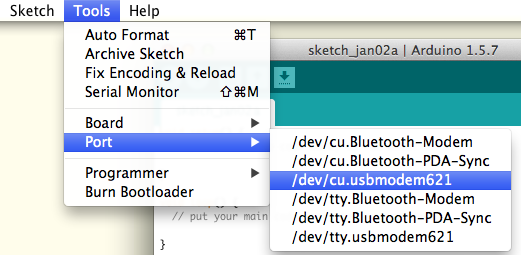
Finally, plug in your toy and turn it on. In the Tools menu, choose Port, and then you can select the port to which your toy is connected. On a Mac, this will show up as a usbmodem port, often as something like /dev/tty.usbmodem621 or /dev/cu.usbmodem621 -- you can select either the tty.usbmodem port or the cu.usbmodem port and either will work.
On a Windows machine, your toy will show up as an additional COM port.
Once the library is added, import the OSSex.h file to make use of it:
#include <OSSex.h>

void setup() {
 ...
}

void loop() {
 ...
}
Note: if you include the OSSex library in your sketch via Arduino's "Import Library..." menu, it will add an unnecessary
#include <OneButton.h>to your sketch. You should delete this line or you'll have compilation errors.
An object named Toy is available when you load the library. You can interact with your toy through this object.
You need to tell the library which toy you're using. Use setID(ID) to do so:
#include <OSSex.h>

void setup() {
  Toy.setID(0);
}

void loop() {
 ...
}
If ID is 1, it sets up a device based on the Mod Beta. Any other number will set up a device for a LilyPad USB / Atmega32U4. Almost all toys will use an ID of 0.
Toy.setOutput(int outNumber, int powerLevel);
-1 can be given as an outNumber as shorthand for "set all outputs to powerLevel". Otherwise, the output will be set according to the following formula:
outNumber = abs(outNumber) % dev.outCount;
Below is a table of how example outNumber arguments would work in a 3-output (0, 1, and 2) toy:
| outNumber | Actual Output |
|---|---|
| -2 | 2 |
| -1 | All outputs |
| 0 | 0 |
| 1 | 1 |
| 2 | 2 |
| 3 | 0 |
| 4 | 1 |
| 5 | 2 |
| ... |
powerLevels are constrained to a value from 0 to 255 inclusive. Some devices may have outputs that are capable of negative powerLevels, such as bidirectional motors. These devices have the bothWays flag set to true and will have powerLevel constrained to values between -255 and 255 inclusive. A powerLevel of 0 will turn the output off.
setOutput() returns 1 currently.
Toy.setLED(int ledNumber, int powerLevel);
setLED() sets a given ledNumber to a given powerLevel. This function does not yet support the -1 shorthand to apply powerLevel to all LEDs. It constrains powerLevel to be from 0 to 255 inclusive, with powerLevel of 0 turning the LED off.
setLED() returns 1 currently.
Toy.getInput(int inNumber);
getInput() is a wrapper for analogRead(). Since the inputs are often not broken out in numerical order, getInput() provides an easy way to "read input 1, now read input 2", etc. without having to remember the pin mappings of a given device.
Toy.runShortPattern(int* pattern, unsigned int patternLength);
OR
Toy.runPattern(int* function(int));
runShortPattern() and runPattern() allow you to define a sequence of setting the outputs/motors to given power levels for given time durations. See the Getting Creative section for more in-depth information on how to define your own motor patterns.
runShortPattern() and runPattern() return 1 on success and -1 if it cannot allocate enough memory for your pattern. It will return 0 if patternLength is null or if it can't access the first two steps of the callback function.
Serial.begin(9600);
Serial.println(dev.device.outCount);
...
The Toy object has a device struct that can be accessed to determine the device's capabilities. The struct's contents are currently:
struct {
  int deviceId;                     // device identifier number
  bool bothWays;                    // can outputs go both forward and backward?
  uint8_t outCount;                 // number of outputs (electrodes, motors)
  uint8_t outPins[_max_outputs];    // array mapping to output pins
  uint8_t tuoPins[_max_outputs];    // array mapping to reverse output pins;
  bool isLedMultiColor;             // do we have multicolored LEDs?
  uint8_t ledCount;                 // number of LEDs
  uint8_t ledPins[_max_leds];       // array mapping to LED output pins
  uint8_t inCount;                  // number of input pins
  uint8_t inPins[_max_inputs];      // array mapping to input pins
  struct {
    OneButton button;               // button object
    unsigned int pin;               // onboard pin
    unsigned int memAddress;        // EEPROM address for storing button state
  } buttons[1];
} device;
This struct is defined in OSSex.h, along with the _max_outputs, _max_leds, _max_inputs and a few other constants.
Comingle devices use the OneButton Arduino library to allow single click, double click, and long press events on the device's button(s).
Toy.attachClick(function);
Toy.attachDoubleClick(function);
Toy.attachLongPressStart(function);
Toy.attachLongPressStop(function);
Toy.duringLongPress(function);
attachClick() will execute function whenever the button is pressed. On LilyPad-based devices, the button is attached to digital pin 2 and will read LOW when the button is pressed.
#include <OSSex.h>

int m = 255;

void led() {
  Toy.setLED(0, m);
  if (m == 255) {
    m = 0;
  } else {
    m = 255;
  }
}

void setup() {
  Toy.setID(0);
  Toy.attachClick(led);
}

void loop() {
}
This example will turn the LED on when the button is pressed, and turn it off when the button is released.
delay() and millis() will not work properly in double-click, single-click or long-press functions since those functions are triggered by an interrupt, and time stops during interrupts.
You can increase or decrease the power of a pattern while it's running to tune it to a comfortable setting. You do that with 3 functions:
setPowerScale()increasePower()decreasePower()
On a Mod you can double-click the button to increase the power, or hold and release the button to decrease the power. setScale() lets you define how much the power changes with each double-click or button-hold:
#include <OSSex.h>

void setup() {
  Toy.setID(0);
  Toy.setScale(0.2);
  Toy.attachDoubleClick(doubleClick);
  Toy.attachLongPressStart(longPress);
  ...
}

void doubleClick() {
  Toy.increasePower();
}

void longPress() {
  Toy.decreasePower();
}

...
This would set a double-click to increase the power by 20%, and a button hold-and-release to decrease the power by 20%: the scale is set to 20% (0.2), and then the doubleClick() function is attached to the double-click behavior, while the longPress() function is attached to the button hold-and-release behavior.
The OSSex library includes several functions for changing the time scale of patterns:
setTimeScale()increaseTime()decreaseTime()
setTimeScale() sets the how much increaseTime() and decreaseTime() will increase or decrease whenever called. For example, setTimeScale(0.2) will cause increaseTime() slow everything down by 20%, and decreaseTime() to speed everything up by 20%.
You can make your toy run all kinds of motor patterns: make them fade in and out, respond to a sensor, jump around randomly, be on full-blast, however you want.
A motor pattern is a sequence of steps. Each step has 3 parts:
- Which output/motor you want
- What power level you want (generally 0-255, with 0 being off)
- How long the step should run (in milliseconds)
{1, 40, 5000} would turn motor 1 on to a power level of 40 for 5 seconds before the next step would run.
You can run patterns a couple of different ways:
- You can make a pattern array and run it with
runShortPattern():
#include <OSSex.h>

int pattern[][3] = {
    {-1, 200, 1000},
    {-1, 0, 1000},
};
unsigned int patternSize = sizeof(pattern) / sizeof(int) / 3;

void setup() {
  Toy.setID(0);
}

void loop() {
  Toy.runShortPattern(*pattern, patternSize);
}
Supply runShortPattern() with an array and an array length, and it will turn all the motors on to a level of 200 for 1 second, and then turn them off (also for one second). Since this function is being run within loop(), the pattern will just repeat over and over and the motors will turn on and off at one second intervals.
This way requires you to come up with your patterns by hand, and is not practical for large patterns, but perfectly fine for simple ones like the one above.
- You can make a pattern function and use
runPattern():
int step[3];
int* blip(int seq) {
  step[0] = -1;

  if (seq % 2) {
    step[1] = 0;
  } else {
    step[1] = 200;
  }

  step[2] = 1000;

  return step;

}

void setup() {
  Toy.runPattern(blip);
}
(If you're not familiar with the % operator, it's the modulo operator, and it gives you the remainder after division. So seq % 2 is saying "If seq divided by 2 has a remainder, then do this. Otherwise do that." It's an easy way to check if a number is odd or even, or to do something in an alternating fashion, such as turn a motor on and off repeatedly)
When runPattern() is given a function, it will run that function every time it needs the next step in the pattern. It provides an increasing sequence number as an argument. So the software will handle it like this:
- Run
blip(0) - Get
{-1, 200, 1000}as a result - Run it (turn all motors on to 200 for 1 second)
- Run
blip(1) - Get
{-1, 0, 1000}as a result - Run it (turn all motors off for 1 second)
- Run
blip(2) - Get
{-1, 200, 1000}as a result - Run it (turn all motors on to 200 for 1 second)
- Run
blip(3)
... (run forever, or until blip() returns NULL)
Note: Since the pattern function returns the next pattern step as an array, the step variable must be a global variable. Arrays in C/C++/Arduino are passed as pointers, and if the step variable isn't global it will disappear after the function is finished and the pointer will be useless.
Making pattern functions for something simple like turning a motor on and off for 1 second is not necessarily the easiest way, but becomes necessary for more complicated patterns. Suppose we wanted to turn all the motors on and ramp their intensity up to max (255), then ramp back down to 0. We could do it like this:
int step[3];
int* fade(int seq) {
  step[0] = -1;
  step[2] = 50;

  // Our sequence runs from 0 to 255 and back to 0 in increments of 5
  // 0 -> 255: 51 steps
  // 255 -> 0: 51 steps
  // --------- 102 steps total

  // normalize sequence
  seq %= 102;

  if (seq <= 51) { // ascending
    step[1] = 5 * seq;
  } else { // descending
    step[1] = 255 - 5*(seq-51);
  }
  return step;
}
Rather than creating an array that looks like: {-1, 0, 50}, {-1, 5, 50}, {-1, 10, 50}, {-1, 15, 50} ... the function will do it for us. We just use our seq sequence number to know where we are in the pattern.
You could also get even simpler, and use a periodic function like sin(), cos(), tan(), etc:
int *fadeCos(int seq) {
  step[0] = -1;
  step[2] = 50;
  step[1] = round(127 * cos((seq / (8*PI))-PI) + 127);
  return step;
}
Where did 127 * cos((seq / (8*PI))-PI) + 127 come from? From progressively changing cos(x) until it gave the right behavior. One of the easiest ways to do this is by typing "cos(x)" in to Google, viewing the graph of the function and modifying it until it looks right (starts at 0, peaks at 255ish, has a long enough period that it smoothly transitions power levels). The steps for doing this are laid out in our patterns howto.
Pattern functions make experimentation a lot easier. You could change step[2] = 50; from 50 to 100 and it affects all the steps without having to rewrite every step of a giant array. You could also print the output of your function to the serial console to make sure it's behaving appropriately:
void setup() {
  Serial.begin(9600);
}

int m = 0;
void loop() {
  Serial.println(fade(m));
  m++;
  delay(300);
}
Pattern functions also use a lot less memory since you aren't storing every step of the sequence but generating them one at a time as needed. This gives you more space to come up with interesting patterns!
runShortPattern() will not return until the pattern has finished running. That means the rest of your code will not run until the pattern is finished.
runPattern(), however, will return immediately, even while your pattern continues to run. This is because pattern functions lend themselves to running for a very long time and being interrupted (by a button click perhaps). This way you can create functions that are 5, 500, or infinite steps in duration without your pattern function delaying other code from running.
We can modify the blip() function to terminate after running the on-off sequence twice:
int step[3];
int* blip(int seq) {
  step[0] = -1;

  /* NEW */
  seq %= 5;

  if (seq % 2) {
    step[1] = 0;
  } else {
    step[1] = 200;
  }

  step[2] = 1000;

  /* NEW */
  if (seq == 4) {
    return NULL;
  } else {
    return step;
  }
}
We now have 5 steps: on, off, on, off, and then NULL to terminate. Since seq starts at 0, we know that by the time it equals 4, we're on our 5th step and should return NULL.
If you wish to store various patterns and switch between them, there are three functions provided to assist with that: addPattern(), cyclePattern(), and runPattern().
addPattern() will add your function to an internal queue of available pattern functions. cyclePattern() will then switch to the next pattern in the queue;
#include <OSSex.h>

int step[3];

void setup() {
  Toy.setID(0);
  Toy.addPattern(fade);
  Toy.addPattern(blip);

  Toy.attachClick(click);
}

void loop() {
}

void click() {
  Toy.cyclePattern();
}

int* fade(int seq) {
  step[0] = -1;
  step[2] = 50;

  // Our sequence runs from 0 to 255 and back to 0 in increments of 5
  // 0 -> 255: 51 steps
  // 255 -> 0: 51 steps
  // --------- 102 steps total

  // normalize sequence
  seq %= 102;

  if (seq <= 51) {
    step[1] = 5 * seq;
  } else {
    step[1] = 255 - 5*(seq-51);
  }
  return step;
}

int* blip(int seq) {
  step[0] = -1;

  if (seq % 2) {
    step[1] = 0;
  } else {
    step[1] = 200;
  }

  step[2] = 1000;

  return step;

}
When you turn on the your toy, it will do nothing. Once you press the button, it will start the fade() pattern, and it will run indefinitely. Clicking the button again will change it to run the blip() pattern, and clicking it again will move it back to fade().
runPattern(), when run with an integer argument (such as runPattern(3)), will access that pattern from the queue and run it. It will return -1 if there are no patterns to access and -2 if the argument is greater than the number of patterns available.


