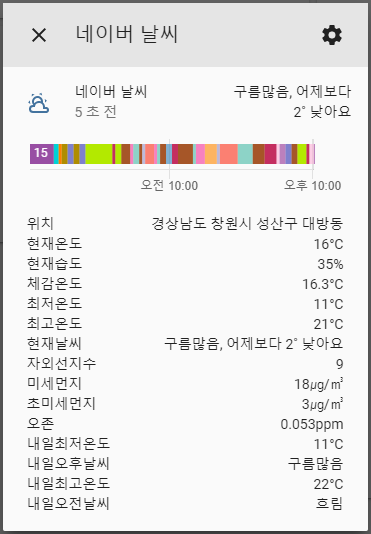
네이버 날씨 Sensor for Home Assistant 입니다.
네이버 날씨 웹페이지를 크롤링하여 센서로 추가해 줍니다.
아무래도 크롤링을 해서 가져오는 부분이라 센서에서 호출하는 부분은 최소화할 수 있도록 했습니다.
sensor.naver_weather(부모) - sensor.nw_*(자식) 센서라고 생각하시면 됩니다.
weather / weather.naverweather
└ sensor / sensor.naver_weather
└ child / sensor.nw_*
부모 센서가 update 되는 시점에 자식 센서에 값을 함께 update 하도록 했습니다.
- senseor


- weather


| Version | Date | 내용 |
|---|---|---|
| v1.0.0 | 2020.05.07 | First version |
| v1.0.1 | 2020.05.08 | - 미세먼지/초미세먼지/오존/자외선 가져오기 수정 - 미세먼지등급/초미세먼지등급/오존등급 추가 |
| v1.0.2 | 2020.05.09 | - 자외선 가져오기 오류수정 - 시간당 강수량 가져오기 추가 - 오타수정 |
| v1.0.3 | 2020.05.10 | 시간당 강수량 가져오기 오류수정 |
| v1.0.4 | 2020.05.10 | 오타수정 |
| v1.0.5 | 2020.05.12 | - 풍속/풍향 추가 - 속성순서 수정 |
| v1.0.6 | 2020.05.12 | 현재습도 수정 |
| v1.1.0 | 2020.05.13 | weather.py 추가 |
| v1.1.1 | 2020.05.14 | 내일오전날씨/내일오후날씨 수정 |
| v1.1.2 | 2020.05.25 | SUB 지역(area_sub) 추가 |
| v1.1.3 | 2020.05.25 | 오류 수정 |
| v1.2.0 | 2020.06.18 | weathe에 sensor 통합 |
| v1.2.1 | 2020.10.14 | weathe, sensor 현재습도, 현재풍속 가져오기 수정 |
- HA 설치 경로 아래 custom_components 에 파일을 넣어줍니다.
<config directory>/custom_components/naver_weather/__init__.py
<config directory>/custom_components/naver_weather/manifest.json
<config directory>/custom_components/naver_weather/sensor.py
<config directory>/custom_components/naver_weather/weather.py - configuration.yaml 파일에 설정을 추가합니다.
- Home-Assistant 를 재시작합니다
- HACS > Integretions > 우측상단 메뉴 > Custom repositories 선택
- 'https://github.com/miumida/naver_weather' 주소 입력, Category에 'integration' 선택 후, 저장
- HACS > Integretions 메뉴 선택 후, naver_weather 검색하여 설치
- HA설정에 naver_weather weather를 추가합니다
- sensor_use를 'Y'로 설정한 경우, sensor에 설정을 추가하실 필요없습니다.
weather:
  - platform: naver_weather
    area: '날씨'
sensor_use: 'Y'- HA 설정에 naver_weather sensor를 추가합니다.(sensor만 사용하고 싶은 경우)
sensor:
  - platform: naver_weather
    name: naver_weather
area: '날씨'| 옵션 | 내용 | sensor | weather |
|---|---|---|---|
| platform | (필수) naver_weather | O | O |
| name | (옵션) default(naver_weather) | O | X |
| area | (옵션) 원하는 동네 / default(날씨) | O | O |
| scan_interval | (옵션) Sensor Update Term / default(900s) | O | O |
| area_sub | (옵션) 원하는 추가 동네 / default(날씨) | O | O |
| scan_interval_sub | (옵션) Sensor Update Term / default(1020s) | O | O |
| sensor_use | (옵션) Sensor Use(Y or N) / default(N) | X | O |
area는 기본값으로 '날씨'로 들어갑니다.
기본적으로 날씨로 지정되면 장비가 있는 위치를 기준으로 날씨가 나오는거 같았습니다.
추가로 area에 원하시는 지역을 네이버에서 검색하셔서 입력해보시고 날씨가 조회되면 area에 입력하시면 됩니다.
'https://search.naver.com/search.naver?query=창원시+성산구+대방동+날씨' 와 같은 형태로 확인이 됩니다.
query= 뒷부분에 있는 부분을 arae로 입력하시면 됩니다.
띄워쓰기를 + 또는 %20으로 변경하시면 됩니다. 물론 네이버에 정상적으로 검색되는지 확인이 필요합니다.

[1] 네이버 HomeAssistant 카페 | af950833님의 [HA] 네이버 날씨 (https://cafe.naver.com/stsmarthome/19337)
